A grown woman once paid me to sew on a button, which is exactly why I think every parent should teach kids to sew.
My girls grew up surrounded by needles, scissors and measuring tape, because I was making a good bit of money from alterations and dressmaking while they were little. Most evenings I also had a smaller craft project on the go, so stitching was simply part of the furniture. Before long, both of them were joining scraps of fabric into the most adventurous Barbie dresses you’ve ever seen.
One afternoon a friend came over for coffee, and my older daughter marched in to show off her latest creation. My friend laughed and admitted she couldn’t sew on a button to save her life, because her mum had always done those jobs for her and never had the time to show her. Her mum has sadly passed away since, and now she pays me to do her buttons.
So that day, instead of gossiping (just this once!), I showed her and my daughter how to sew one on properly. One cup of tea, about ten minutes, job done.
Sewing is a life skill, right up there with cycling and swimming, and it has the bonus of being doable over a cuppa. In this guide I’ll walk you through the best age to start, the supplies actually worth buying, and the mistakes to dodge.
Why Should Kids Learn to Sew?
Sewing is way more than a cute craft. It’s a hands-on activity that gets kids thinking, creating and picking up life skills without them even noticing. Here are the biggest benefits of teaching kids to sew.
1. Sewing Develops Fine Motor Skills
Threading a needle, holding fabric steady and making tiny stitches all ask a lot of little fingers. That’s brilliant practice for fine motor control and hand-eye coordination, the same skills kids need for handwriting.
For younger children, even pushing a big, blunt plastic needle through felt is a proper workout. Tip: start with felt, because the needle glides through it and the stitches are easy to see.
2. It Encourages Patience and Concentration
Let’s be honest, kids aren’t exactly queuing up to slow down and do one small step at a time! Sewing gives them a reason to try. They have to watch where the needle goes, how the thread moves, and what happens when a stitch gets yanked too tight (cue the puckered fabric and the groan).
Over time, children learn to slow down, work through mistakes and actually finish what they started. That’s a tall order for most adults, never mind an eight-year-old.
3. It Builds Confidence
There’s something special about making a thing with your own two hands. When a child finishes a little pillow, a felt bookmark or a stuffed toy, they can see what their effort produced.
I saw this first-hand with my girls and their Barbie dresses. Wonky seams and all, those dresses were worn with serious pride, and that feeling made them want to try something harder next time. The finished project doesn’t have to be perfect, because a slightly crooked seam can hold a whole lot of pride.
4. It Teaches Problem-Solving (and How to Turn 2D into 3D)
What happens when the thread gets tangled? Why is the fabric flat and floppy when it should be a pocket? How do you join two pieces of cloth so they stay put?
These little puzzles push kids to figure out what went wrong and how to fix it. Resist the urge to jump in and take over (I know, it’s hard!). Try asking, “What do you think we could do differently?” and you might be surprised by what they come up with.
Sewing also teaches the brain to turn something flat into something with shape. A few flat pieces of fabric become a pouch, a soft toy or a doll’s dress, and kids have to picture how the pieces fit together before they stitch. That kind of spatial thinking is a big deal, and it’s hard to teach with a worksheet.
Now, I never liked puzzles. We did plenty when the girls were little, because every development book swore they were vital for the brain, but it always felt like a waste of time. Hours spent putting a picture together, only to tip it back into the box!
Sewing is a puzzle with a point. The pieces join up into a picture, a garment, a bookmark or a purse, and at the end you’ve got something to keep (and wear, and show off).
What Age Should Kids Start Learning to Sew?
There’s no single magic age for starting to sew, because kids develop at wildly different speeds. Interest, coordination, patience and the ability to follow safety rules matter far more than the number on the birthday cake.
Here’s a rough guide to help you find the right starting point.
| Age group | Suitable sewing activities | Recommended tools |
|---|---|---|
| Ages 3-4 | Lacing cards and threading big beads onto a shoelace | Plastic lacing cards, chunky laces and large beads |
| Ages 5-7 | Simple stitches through pre-punched felt | Blunt plastic needle, thick yarn or embroidery floss, and an adult sitting close by |
| Ages 8-10 | Running stitch, whip stitch, sewing on a button, simple felt crafts like bookmarks and pouches, and a first go on the sewing machine | Blunt tapestry needle with a big eye, embroidery floss, felt, and a basic machine with an adult right beside them |
| Ages 11-12 | Small bags, pillows and simple repairs | Hand-sewing kit and a sewing machine |
| Ages 13 and up | Clothing alterations, more detailed projects and independent machine sewing | Full hand-sewing kit and a machine, plus proper instruction |
Treat these ages as guidelines, not rules. My girls started earlier than this because needles and machines were part of everyday life in our house, so it came naturally to them. If your child starts later, they’re not behind.
Getting the level right is often a fine line between too easy and too hard. That’s where teamwork comes in, because it can turn a minus into a plus!
Sometimes it’s just one tricky part that’s too much, or the frustration is starting to bubble up. I offer my help and show them again how it’s done, and they usually take the piece back off me before I’ve finished the job.
The golden rule? Start with what your child can manage comfortably, not what you think they should be able to do by their age.
Essential Sewing Supplies for Kids
1. Felt, and Later Fat Quarters
Felt is my go-to for beginners because it doesn’t fray, and that makes life so much easier in the early days. Pick a few bright colors and you’re set for bookmarks, hearts, decorations and little stuffed shapes.
As your child progresses, I love fat quarters for small projects. They’re basic cotton fabric, sold in bundles of plain or printed pieces, and they usually come themed, so picking a bundle is half the fun.
Just know that cotton frays, so an overlocker (or serger, if you’re stateside) comes in handy. No overlocker? A zigzag stitch along the raw edges does a decent job.
2. Needles
Choose needles to suit your child’s age, coordination and project. Large plastic lacing needles are great for threading through pre-punched holes, and for actual sewing you’ll want a suitable hand-sewing needle and an adult nearby.
Can a needle hurt? Yes. Is it the end of the world? No, and I’m living proof.
I sewed from a very young age, and one day, while playing ghosts with friends, I stepped right into an upside-down pin cushion. My screams probably woke a few ghosts from their graves! Dad had to carry me to the bathroom and pull the pins out of my foot, and I limped for a week or two. I survived, though, and still became a seamstress.
So don’t panic if your child gets the odd prick. Just keep an eye on them, and always put pins and needles back where they belong (and never leave a pin cushion lying upside down on the floor!).
3. Embroidery Floss or Yarn
Embroidery floss makes stitches easy to see, while thicker yarn is easier for little fingers to grip and push through big holes. Go for a color that contrasts with the fabric. White thread on white felt is a recipe for squinting and frustration!
Bright colors also make it easier to follow the thread and see how a stitch actually forms.
4. Child-Appropriate Scissors
Use scissors made for your child’s age and ability. For younger kids, you can cut the fabric and thread before you start, and older children can cut their own pieces with suitable scissors and an adult close by.
Tip: keep one pair of scissors for fabric only, because paper dulls them fast. Keep your sharp adult scissors and rotary cutters well out of reach when they’re not in use.
5. Fabric Markers and Templates
Simple templates make sewing so much easier, because kids can see exactly where the stitches should go. Draw a heart, star, square or circle on paper and use it as a pattern. For younger beginners, mark the stitch positions on the fabric or prepare the holes in advance.
It’s a tiny step that makes a big difference. Instead of guessing where the next stitch belongs, they get a clear path to follow.
6. A Small Sewing Box
Keep everything together in a sturdy box with a secure lid. Needles, pins, scissors and other sharp tools should be stored safely, especially if younger children are around.
3 Easy First Stitches to Teach a Child
These three stitches will get most beginner projects put together. They do ask for a bit of practice, though, because ideally the stitches should be even and all the same length.
Don’t worry if the first attempts look a bit wobbly! Even stitches come with time, and I’d teach them in this order, because each one builds on the one before.
1. The Running Stitch
This is the stitch to start with: up, down, up, down. Draw a dotted line on the felt with a washable marker so there’s a clear path to follow. Say it out loud as a little chant, because kids love a rhythm.
Don’t pull the thread too tight, or the fabric puckers and you’ll get the groan.
2. The Backstitch
Backstitch is the strong one, and it makes a solid line with no gaps. Bring the needle up, take a small stitch backwards, then come up one stitch length ahead and go back down into the end of the last stitch.
It sounds fiddly, but the trick is “back, then forward, then back again”. It’s great for outlines, lettering and seams that need to hold, so wait until the running stitch feels easy before you try it.
3. The Whip Stitch
Place two pieces of felt together and stitch over the edge, round and round, until they’re joined. This is where flat pieces turn into a pouch or a soft toy, and it’s the magic moment for most kids. Leave a gap for stuffing if you’re making a little cushion or toy.
Finishing Off Neatly
Whichever stitch you use, finish with two or three small stitches on top of each other, then snip the thread. It’s not the most exciting step, but it stops all that hard work from unraveling.
How to Teach Kids to Sew Step by Step
The easiest way to teach children to sew is to break it into small, manageable steps. Don’t start with a complicated stuffed animal or anything that needs perfect measurements. Start simple and build on each new skill.
Step 1: Set Up a Calm Sewing Spot
Lay everything out on the table before your child sits down. I like a good selection: felt in different colors, threads, pins and needles, a few buttons, some ribbons, and the pattern if you’re using one.
Then let them choose. Colors, buttons, beads, all of it is up to them, because this is meant to be fun and as creative as they want it to be. Put some quiet background music on too, which does wonders for the atmosphere.
Step 2: Thread the Needle Together
Threading can be the trickiest part for a beginner, because the eye is small and little fingers get frustrated fast. Younger children do best with a large plastic lacing needle and thick yarn. For older kids, show them how to snip the thread cleanly and guide it through the eye.
Keep the thread about as long as your child’s forearm (roughly 30-45 cm). Any longer and it tangles, and then it’s a battle! If the end keeps fraying, trim it and try again, or use a needle threader.
Step 3: Tie a Knot at the End
Show them how to wrap the thread around a fingertip, roll it off and pull it tight. Some kids get it straight away and some need ten goes, and both are completely normal. If the knot keeps slipping, tie a second one on top of the first.
Step 4: Practice on a Scrap
Before a real project, give them time to play. Draw a straight line on a piece of felt and let them stitch along it, then try a gentle curve or a simple shape.
This is where patience matters, for you as much as for them. If you correct every wobble, they may lose interest before the first row is finished. Praise the effort and offer just one suggestion at a time.
Step 5: Join Two Pieces
Once the stitches feel comfortable, line up two pieces of felt and sew along the edges with a whip stitch. Keep the stitches close enough to hold, because big gaps mean the stuffing escapes or the seam pulls apart.
For a little cushion or soft toy, leave a small opening for stuffing, then sew it closed at the end. Younger children may need a hand with that last part, and that’s perfectly fine.
Step 6: Celebrate the Finished Project
Let them show it off! Display it, use it, or give it to someone special, because a handmade gift is a lovely way to share creativity.
Then have a chat about it. Which part was easiest, which part was tricky, and what would they like to make next? That little conversation can turn one afternoon of sewing into an interest that keeps growing.
When It Gets Tricky
Every child hits a wall at some point, usually over one fiddly bit. Offer to help, show them again how it’s done, and let them take it back as soon as they’re ready.
3 Easy Sewing Projects for Kids
Once your child has practiced the basics, it’s time to make something fun.
Choose projects that can be completed in a short session. A small success is often more motivating than a complicated project that takes several days to finish.
1. A Felt Bookmark with Buttons
Best for: Children who are just getting started.
A bookmark is quick, it makes a lovely gift, and it’s the perfect first go at sewing on a button. Pile a few different buttons on the table and let your child choose. Big ones, small ones, mismatched ones, the more the merrier!
You’ll need:
- A strip of felt
- Embroidery floss
- A blunt needle
- A handful of different buttons
How to make it:
Cut the felt into a long rectangle. Let your child arrange the buttons on it before sewing anything, so they can play with the layout and decide what goes where. Then sew the buttons on one at a time, and add a running stitch along the edges if they fancy it.
Tip: slide a matchstick or toothpick between the button and the fabric while you stitch. It leaves a little gap, so the button sits nicely and doesn’t pull tight.
2. A Simple Felt Pouch
Best for: Children who have practiced the running stitch.
A small pouch can hold lightweight items such as paper notes, craft shapes, or other suitable treasures.
You’ll need:
- One rectangle of felt
- Embroidery floss
- A suitable needle
- Decorations, if desired
How to make it:
Fold the bottom of the rectangle upward to create a pouch shape. Sew the two side edges together, leaving the top open.
Your child can decorate the front before sewing the sides. This is often easier than trying to add decorations after the pouch has been assembled.
Avoid adding buttons, beads, or other small decorations to projects intended for children who may put objects in their mouths.
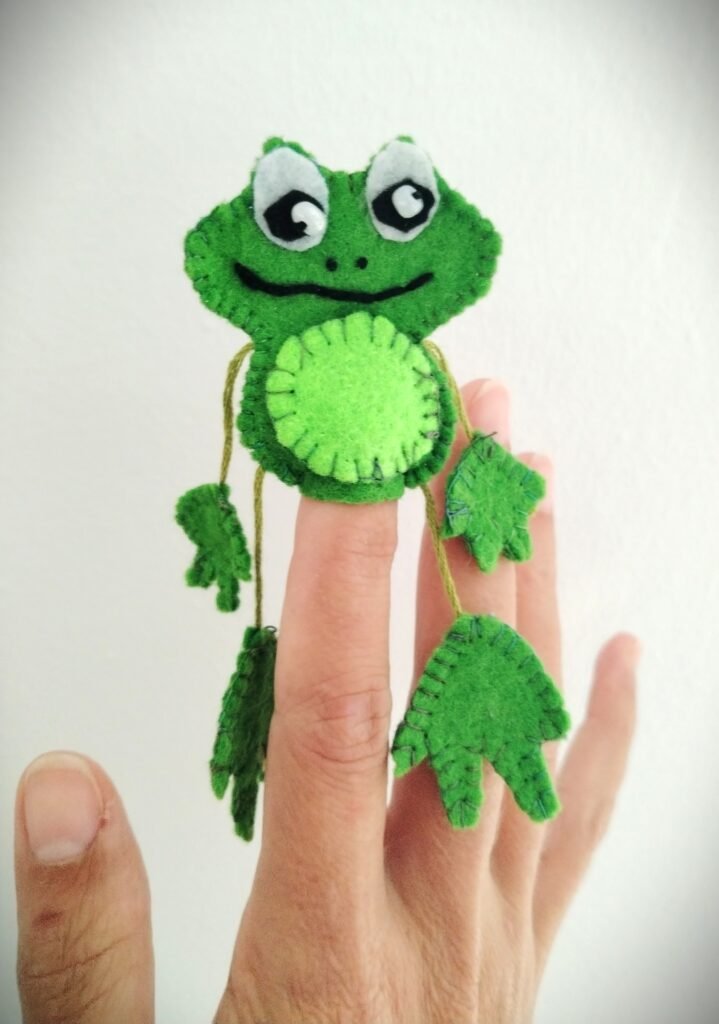
3. A Frog Finger Puppet
Best for: Children who are happy with the whip stitch and want something to play with afterwards.
This one turns straight into a toy, which is half the fun. Once the last stitch is done, the frog gets a voice, a name and probably a whole story line.
You’ll need:
- Green felt
- Scraps of white and black felt for the eyes
- Embroidery floss
- A blunt needle
How to make it:
Join two frog-shaped pieces with a whip stitch, leaving the bottom open so the puppet slips onto a finger. Add the eyes and any other little details your child fancies.
You’ll find the full step-by-step in my frog finger puppet tutorial.
Should Kids Learn Hand Sewing or Machine Sewing First?
For most beginners, hand sewing is a useful place to start.
It allows children to see exactly how stitches work and gives them time to develop coordination without needing to control a motorized machine at the same time.
However, the right choice depends on the child’s age, interest, coordination, and ability to follow safety instructions.
| Feature | Hand sewing | Machine sewing |
|---|---|---|
| Best starting point | Often suitable for early sewing lessons | Usually introduced when the child is ready for more complex tools |
| Equipment | Needle, thread, and fabric | Sewing machine, thread, fabric, and suitable accessories |
| Learning focus | Stitch placement and hand control | Fabric control, machine operation, and straight seams |
| Project speed | Usually slower | Often faster once the basics are learned |
| Adult supervision | Needed when needles or scissors are used | Essential, especially during early lessons |
When Is a Child Ready for a Sewing Machine?
Age alone shouldn’t determine readiness.
A child should be able to follow instructions, keep fingers away from the needle area, understand the machine’s controls, and stop when asked. They also need an adult who can teach and supervise them properly.
Start by explaining the machine’s parts and showing how to operate it safely. Keep hands away from the moving needle, turn the machine off before threading or making adjustments, and follow the manufacturer’s safety instructions.
Never leave a child alone with a running sewing machine.
A good first machine-sewing project is a straight line on a scrap of fabric, with the adult managing setup and helping as needed. There’s no need to rush into making a whole garment.
7 Common Mistakes Parents Make When Teaching Kids to Sew
Teaching a new skill can be just as much of a learning experience for parents as it is for children.
Here are some common problems to watch for.
Mistake 1: Starting With a Complicated Project
A large stuffed animal or a detailed fabric bag might look exciting, but too many steps can overwhelm a beginner.
Try this instead: Begin with a felt heart or bookmark. Once your child can manage a simple seam, move on to more challenging projects.
Mistake 2: Expecting Perfect Stitches
Uneven stitches are a normal part of learning.
If you unpick every crooked stitch, your child may start to believe that mistakes mean failure.
Try this instead: Focus on whether the stitches hold the fabric together. Neatness can improve with practice.
Mistake 3: Using Thread That’s Too Long
Long thread can become tangled, knotted, and difficult to pull through fabric.
Try this instead: Start with a manageable length, around 30–45 cm (12–18 inches), and adjust it according to the project and child’s ability.
Mistake 4: Doing Too Much for Your Child
It’s tempting to step in when a stitch goes wrong, especially when you can fix it in seconds.
But if you take over every time, your child misses the chance to develop problem-solving skills.
Try this instead: Demonstrate the step once, then let your child try. Offer help when needed, but leave room for them to figure things out.
Mistake 5: Choosing Difficult Fabric
Slippery, stretchy, or very thin fabric can be hard to control.
Try this instead: Start with felt or stable woven cotton. Save slippery satin and stretchy jersey for later.
Mistake 6: Making Sewing Lessons Too Long
Children may lose concentration if a lesson continues after they’re tired or frustrated.
Try this instead: Begin with short sessions of about 10–20 minutes, adjusting the length to your child’s age and interest. It’s better to stop after a small success than to push through a meltdown.
Mistake 7: Forgetting Safety Rules
Needles, scissors, pins, and sewing machines all require care.
Try this instead: Establish simple rules before each lesson. Needles stay at the sewing table, sharp tools are handled only with permission, and everything is counted and put away afterward.
If a needle is lost, stop the activity and locate it before anyone leaves the area.
How to Keep Kids Interested in Sewing
The secret to teaching kids to sew isn’t making every stitch perfect. It’s helping them enjoy the process enough to want to try again.
Here are a few ways to keep sewing lessons engaging.
Let Them Choose the Project
Children are more likely to stay interested when they’re making something they actually want.
One child might love colorful felt animals, while another would rather make a pouch for small treasures. Give them a few options and let them decide.
Use Their Favorite Colors and Themes
Try dinosaurs, flowers, rainbows, superheroes, or whatever catches your child’s interest.
A simple project can become much more exciting when the finished item reflects their personality.
Turn Mistakes Into Learning Moments
When a stitch comes loose or the thread tangles, resist the urge to declare the project ruined.
Instead, explain what happened and show your child how to fix it. Sometimes the most useful lesson comes from a mistake, not a perfect result.
Display Their Work
Hang a finished project on a noticeboard, keep it in a craft box, or use it around the house.
Children appreciate knowing that their work matters. You don’t need to praise every single stitch, but do recognize their effort and progress.
Sew Together
You don’t have to be an expert to learn alongside your child.
You might even make your own beginner project and talk through the challenges together. When children see adults making mistakes, correcting them, and trying again, it helps them understand that learning takes practice.
And hey, if your first attempt at a felt pouch looks a little crooked too, that’s not the end of the world!
Final Thoughts: Help Your Child Discover the Joy of Sewing
Teaching kids to sew isn’t really about perfect pouches or dead-straight seams. It’s about patience, confidence and a skill that stays with them for life, right up there with cycling and swimming. And the bonus is that you can do it over a cup of tea!
My girls picked up needles early simply because needles, scissors and tape measures were part of everyday life in our house, and it led to some very adventurous Barbie dresses. Yours might start at five or at ten, and both are perfectly fine. Begin with what your child can manage comfortably, and remember that a bit of teamwork can turn a tricky part into a triumph.
When the frustration starts to bubble up, step in and show them again how it’s done. They’ll probably take the piece back off you before you’ve finished, which is exactly the point. Put some quiet music on, let them choose their own colours and buttons, and don’t fuss over wobbly stitches, because a crooked seam can hold a whole lot of pride.
Keep safety simple: an adult close by, blunt needles for little ones, and a count of the needles and pins before and after every session. Never leave a pin cushion lying upside down on the floor either, as my foot once found out!
Now I’d love to hear from you. What was your child’s first sewing project, and what went hilariously wrong? Tell me in the comments!