Mistakes to Avoid When Growing Chili Peppers can make or break your harvest. Growing chili peppers should be a fiery love affair, not a heartbreaking disaster. Yet, time and again, gardeners—both wide-eyed beginners and seasoned green thumbs—fall into the same pitfalls. One minute, you’re dreaming of vibrant red Cayennes or deep purple Mulatas, and the next, you’re staring at sad, droopy plants that refuse to fruit. Sound familiar?
Chili peppers are resilient, stubborn little things, but they have their quirks. They need just the right balance of warmth, water, and nutrients, and if you get it wrong? Well, let’s just say you’ll either be nursing leggy, lifeless stems or a jungle of leaves with no peppers in sight. But don’t worry—we’ve been there. We’ve overwatered, planted too late and watched aphids throw tiny garden parties on our precious plants. And we’ve learned.
That’s why we’re here—to make sure you don’t make the same mistakes. Whether you’re growing Cayenne, Aji Delight, Sivri Biber, or any other chili variety, avoiding these 10 common mistakes when growing chili peppers will set you up for a bountiful, spicy harvest.
So, grab your gardening gloves, pour yourself a cup of something warm (or spicy), and let’s make sure your chili-growing journey is filled with fiery success—not frustration!
Some of the links in this post are affiliate links, including links to products on Amazon. This means if you click and make a purchase, I may earn a small commission at no extra cost to you. I only recommend items I genuinely love and believe could add value to your life. Thank you for supporting this blog—it helps keep the content free and full of ideas just for you!
1. Choosing the Wrong Variety for Your Climate
Not all chili peppers are created equal, and your garden will let you know it if you choose the wrong variety for your region. Some peppers, like Cayenne and Mulata, thrive in warm, dry conditions, soaking up the sun like contented little firecrackers. Others, like Aji Delight and Sivri Biber, can handle a bit more humidity, making them better suited for areas with unpredictable weather.
But here’s where many gardeners go wrong: they plant the wrong pepper for their climate, and suddenly, they’re either battling stunted growth, endless leaf drop, or a plant that just flat-out refuses to fruit. It’s like trying to grow a tropical orchid in the middle of a desert—it’s possible, but it’s going to take a lot of effort (and maybe a bit of swearing).
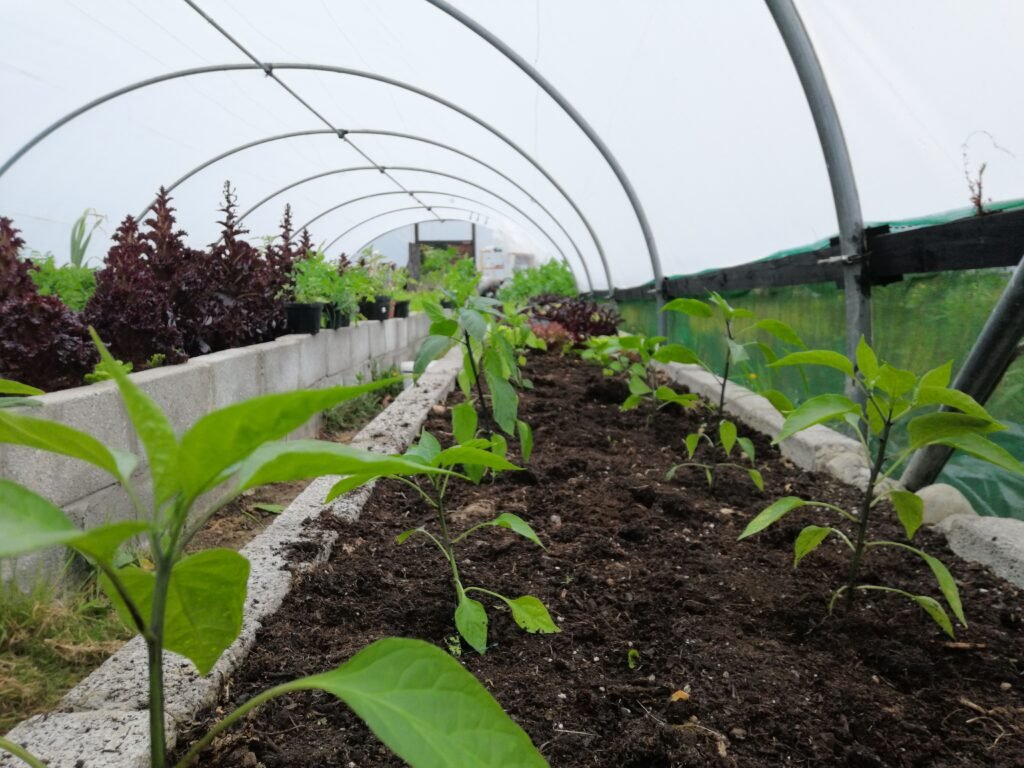
Now, does this mean you can’t grow heat-loving peppers in cooler climates? Absolutely not! You just have to know the challenge and counteract it. Here in the West of Ireland, we still grow Cayenne and Mulata, but we start them early under grow lights and give them the warmth of a polytunnel to mimic their ideal conditions. The key is understanding what your chosen variety needs and giving it a little extra help where necessary.
So, whether you’re in a hot, dry climate or a cool, misty one, the secret to a thriving chili garden isn’t just soil and sunshine—it’s knowing your variety and giving it the best possible start. Do that, and you’ll be harvesting spicy, homegrown success in no time!
2. Starting Seeds Too Late (or Too Early!)
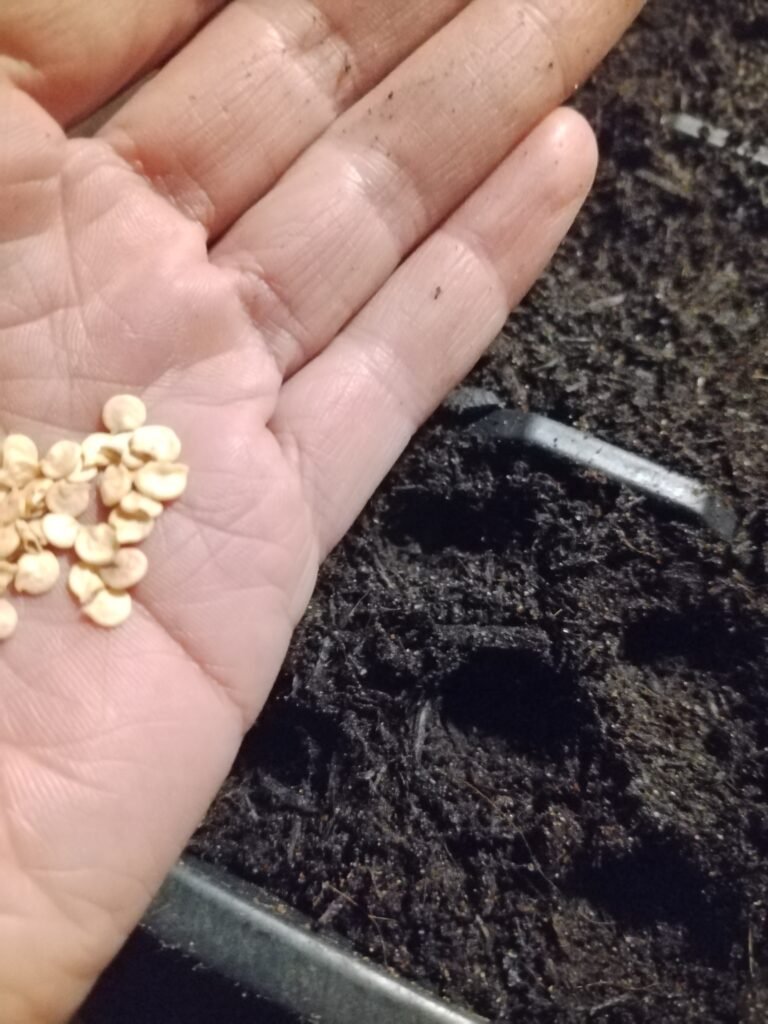
Timing is everything when it comes to chili peppers, and getting it wrong can mean the difference between a lush, fruit-laden plant and a straggly little thing that barely makes it before the frost hits. Start too late, and your peppers won’t have enough time to reach full maturity. Start too early, and you’ll be dealing with leggy, overgrown seedlings longing for real sunlight while winter still lingers outside.
Chili pepper seeds love warmth, and they won’t even think about sprouting unless the soil temperature is at least 18–21°C (65–70°F), with some stubborn varieties like Habaneros demanding 24–29°C (75–85°F) before they make an appearance. If you’re waiting on Mother Nature to provide that warmth, you might be twiddling your thumbs well into spring. That’s why grow lights and heating mats are a chili grower’s best friends—they speed up germination, keep seedlings strong, and help avoid the dreaded slow start.
Here’s the trick: in cooler climates, like here in the West of Ireland, we start our seeds indoors in January or February, using a heat mat to wake them up and grow lights to keep them happy. That way, by the time the weather is warm enough for them to go outside (or into the polytunnel), they’re already well on their way to becoming robust, healthy plants.
If you want earlier, bigger harvests, don’t leave germination to chance. Give your chili seeds the warmth they crave, and they’ll reward you with a bounty of fiery goodness when summer rolls around.
3. Poor Soil Preparation
You wouldn’t build a house on a shaky foundation, and the same goes for growing thriving chili peppers—it all starts with good soil. Chili plants are fussy about where they put down roots, and if your soil is too compact, too sandy, or missing key nutrients, you’re setting yourself up for stunted plants and disappointing harvests.
Chili peppers love well-draining, nutrient-rich soil with a slightly acidic pH (between 6.0 and 6.8). If your soil holds too much water, roots can rot. If it’s too poor in nutrients, you’ll get weak plants with small, lackluster fruit. The fix? Amend your soil before planting. Mixing in aged compost, worm castings, or well-rotted manure will boost fertility, while perlite or sand can improve drainage. If you’re growing in containers, a high-quality organic potting mix is the way to go—one with good aeration and moisture retention.
For an extra boost, organic fertilizers like fish emulsion, seaweed extract, or a balanced chili-specific blend can work wonders. And if you’re serious about soil health, I highly recommend reading “Teaming with Microbes”—a fantastic book that dives into how to build healthy, living soil that supports strong, resilient plants.
If you’re unsure about your soil, a simple soil test kit will tell you exactly what amendments you need. The goal is rich, well-aerated soil that holds moisture without getting soggy—get this right, and your chilies will reward you with bigger, tastier harvests!
4. Overwatering or Underwatering
Watering chili peppers is a fine art—too much, and you’ll drown the roots; too little, and your plants will wilt like a forgotten cup of tea. The trick is consistency, but that’s easier said than done!
Water stress leads to weak plants, blossom drop, and lower yields. Overwatering suffocates the roots, making them prone to rot and fungal diseases. If your chili plants look droopy despite wet soil, have yellowing leaves, or develop mushy stems, you might be guilty of too much love. On the flip side, underwatered chilies have wilting leaves, dry soil, and stunted growth—a clear cry for help!
So, how do you get it right? Stick your finger about an inch into the soil—if it feels dry, it’s time to water. If it’s damp, hold off for another day or two. Chili plants love a deep but infrequent watering schedule—soak the soil thoroughly, then let the top inch dry before watering again. Mulching with straw or compost helps retain moisture and prevents erratic drying.
If you’re growing in containers, consider self-watering pots to maintain the perfect balance. And for those who want to take the guesswork out of watering, a soil moisture meter is a game-changer. The goal? Happy, hydrated chilies that thrive without drowning or drying out!
5. Lack of Proper Sunlight
Chili peppers are sun worshippers, thriving best with 6-8 hours of direct sunlight every single day. Without enough light, they become leggy, weak, and reluctant to fruit—like a sun-starved houseplant stretching toward the window. But too much sun, especially in scorching climates, can lead to scorched leaves and sunburnt fruit (yes, that’s a thing!).
If your chili plants are pale, slow-growing, or failing to flower, they’re likely light-deprived. The fix? Position them in the sunniest spot possible—south-facing gardens or greenhouse corners work best. If you’re growing in a cloudy climate (hello, Irish summers!), supplement with grow lights. A full-spectrum LED light can mimic natural sunlight and keep your peppers happy indoors or in a tunnel.
On the flip side, if your plants are frying under an intense summer sun, a bit of shade cloth during the hottest hours can prevent leaf scorch. In our West of Ireland setup, we grow chilies in our polytunnel, where they get just the right balance of heat and protection.
Bottom line? Happy chilies need consistent light, whether from the sky or an LED bulb. Give them what they crave, and they’ll repay you with fiery, flavorful fruit!
6. Not Providing Enough Nutrients (or Overfertilizing!)
Chili peppers are hungry plants, but like a toddler with a sugar stash, they don’t always know what’s best for them! Too little nutrition, and they’ll sulk with yellowing leaves and stunted growth. Too much, and you’ll end up with a lush, leafy bush that refuses to produce peppers. The key? Balance.
Common nutrient deficiencies include a lack of nitrogen (pale, weak leaves), phosphorus (slow growth and purpling stems), and potassium (brown leaf edges and weak fruiting). A balanced fertilizer with a slight phosphorus boost during flowering works wonders. Look for organic options like fish emulsion, seaweed extract, or a quality compost tea.
Timing is everything. Feed seedlings lightly every couple of weeks, then shift to a higher potassium blend once flowering begins. Overfertilization—especially with nitrogen-rich feeds—encourages excessive leaf growth at the expense of fruit production. If you’ve got a chili plant that looks like a rainforest but hasn’t given you a single pepper, you may have overdone the nitrogen.
For a deep dive into feeding your soil the right way, Teaming with Nutrients by Jeff Lowenfels is a fantastic book to check out. Pair it with a quality organic fertilizer like Dr. Earth Organic Tomato, Vegetable & Herb Fertilizer to keep your chili plants happy and productive!
7. Neglecting Pollination Assistance
Chili peppers are self-pollinating, but that doesn’t mean they don’t appreciate a little matchmaking now and then! While a gentle breeze or buzzing bees usually do the trick, sometimes your plants need a helping hand—especially if you’re growing indoors, in a greenhouse, or in a low-wind area.
If your chili plants are flowering but not setting fruit, poor pollination could be the culprit. The fix? Hand-pollination. A small paintbrush or cotton swab works perfectly—just swirl it around inside each flower to mimic what bees do naturally. Another easy method is giving your plants a gentle shake to distribute pollen.
Of course, nature does a fantastic job when given the right environment. Encourage beneficial pollinators by planting bee-friendly flowers like lavender and borage nearby. Avoid chemical pesticides that can harm helpful insects, and consider installing a small bee hotel to attract solitary pollinators.
8. Ignoring Common Pests and Diseases
Chili peppers may be fiery, but they’re not immune to tiny garden troublemakers! Aphids, spider mites, and whiteflies love feasting on tender pepper leaves, while fungal diseases like powdery mildew creep in when conditions are too damp. Left unchecked, these pests and diseases can stunt growth, reduce yields, or even wipe out an entire crop.
The key is prevention. Keep your plants strong with healthy soil, proper spacing, and good airflow. Regularly inspect leaves (especially the undersides) for pests and use a strong blast of water to knock off early infestations. Introducing natural predators like ladybugs and lacewings can also keep populations in check.
For fungal issues, avoid overhead watering and prune lower leaves to improve circulation. A simple homemade spray of diluted neem oil or a mix of baking soda and water can help stop the spread. Companion planting with marigolds and basil can also deter pests while boosting your garden’s biodiversity.
If you’re dealing with stubborn infestations, organic insecticidal soaps or diatomaceous earth are effective, non-toxic options. And for those who prefer an all-in-one guide, have a look at Organic Pest Control The Practical Guide: How To Naturally Protect Your Home, Garden & Food from Pests & Pesticides (Green Thumb) by Paul Jackson
9. Not Providing Proper Support
Chili plants might look sturdy when they’re young, but once they start producing fruit, those branches can become top-heavy and prone to snapping. A strong wind, an unexpected downpour, or even the weight of a particularly bountiful harvest can lead to broken stems and lost peppers. That’s why giving your chili plants proper support is one of the best ways to ensure a thriving crop.
For smaller varieties like Aji Delight, a few bamboo stakes and some soft garden ties might be all you need. But if you’re growing larger, high-yielding varieties like Cayenne or Mulata, consider tomato cages or a trellis system to keep them upright. The key is to add support early—before the plants start fruiting—so their roots aren’t disturbed later on.
Another great trick? Using a Florida weave method (popular with tomatoes) to create a sturdy wall of support for rows of chili plants.
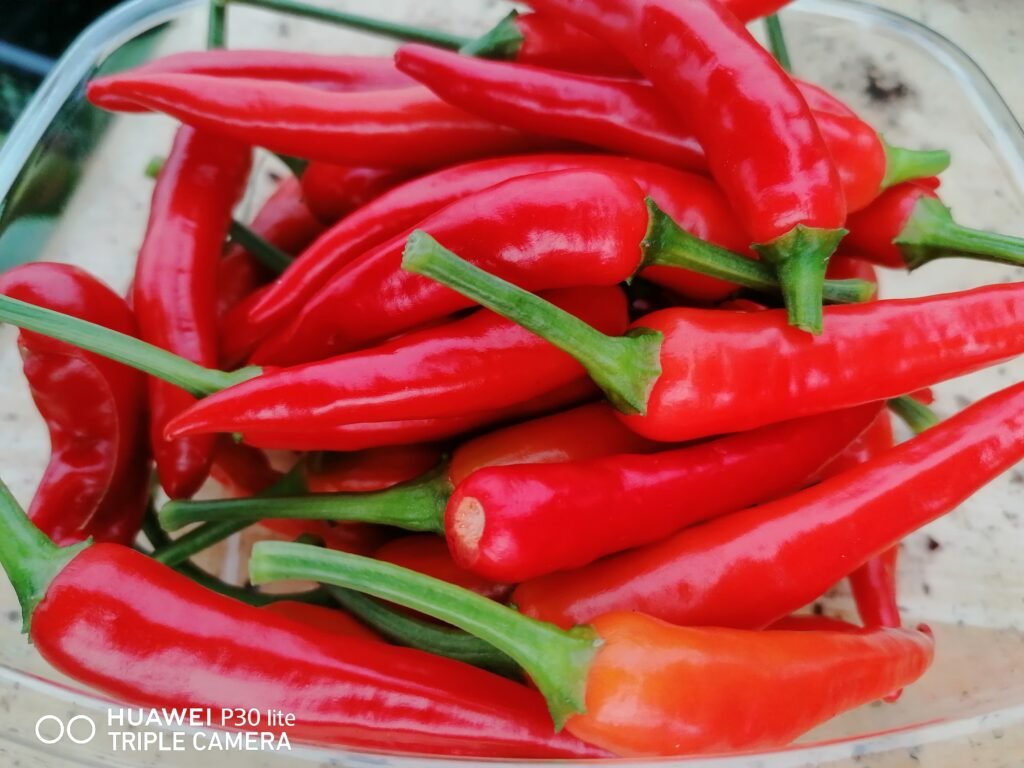
10. Harvesting Too Early or Too Late
Harvesting chili peppers at the right time is an art—pull them too early, and they lack their full heat and flavor; leave them too long, and you might end up with shriveled, overripe fruit. Timing is everything!
Most chili varieties will change color as they ripen, shifting from green to red, yellow, or even deep purple, depending on the type. But color isn’t the only clue—size, firmness, and even a slight wrinkling on the skin can indicate peak ripeness. If you’re after a milder flavor, picking early when they’re still green is fine. But for maximum heat and sweetness, let them fully mature.
A good rule of thumb? If the pepper comes off the plant easily with a gentle tug or snip, it’s ready. Using pruning shears instead of pulling reduces stress on the plant and helps avoid broken stems. And don’t forget—harvesting regularly encourages more production, so keep those peppers coming!
Looking for the best tools to make harvesting easier? A sharp pair of gardening scissors or pruners will keep your plants healthy while making the job effortless.

Conclusion
Growing chili peppers isn’t hard, but avoiding these common mistakes can mean the difference between a weak, struggling plant and a thriving, high-yielding harvest. By choosing the right variety, providing proper care, and sidestepping these pitfalls, you’ll have an abundance of delicious, homegrown chilies to enjoy.
Whether you’re growing Cayenne for its fiery kick, Mulata for its smoky depth, or a milder variety like Aji Delight, success starts with knowledge—and a little bit of patience. Give your plants the right start, keep an eye on their needs, and they’ll reward you with a bountiful harvest season after season.
Ready to start growing your best chilies yet? Check out our complete guide to growing chili peppers for more in-depth tips, and browse our chili seed selection to grab the perfect variety for your garden!