


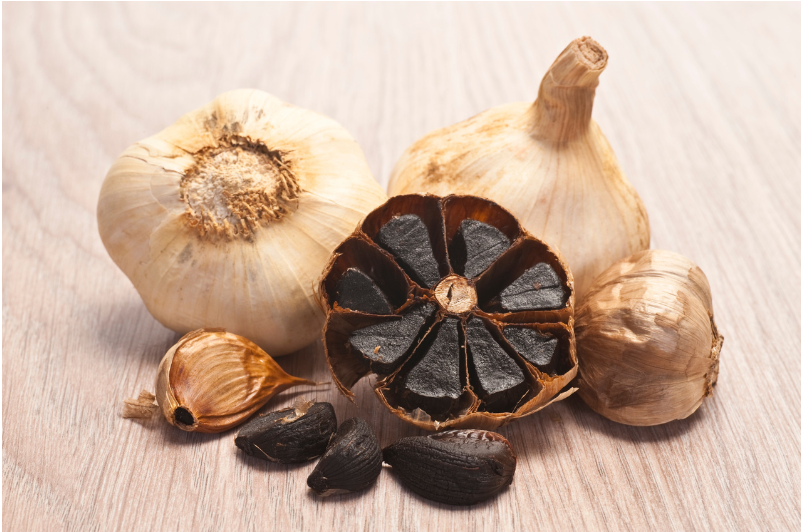
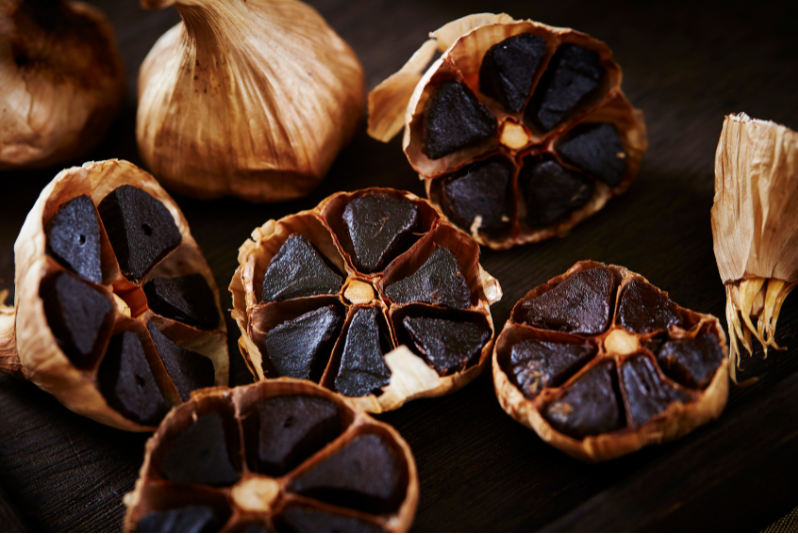
Did you know that the humble clove of garlic can be transformed into something that tastes like a gourmet secret ingredient? We discovered black garlic a couple of years ago, and let me tell you – it changed my starter and snack game forever! I mean who could pass on a gourmet black garlic crostini, right?
Listen to this: black garlic isn’t just trendy – studies have shown it contains twice the antioxidants of regular garlic. Pretty amazing, right? As someone who loves making snacks and lunches that my kids eat as well as love and I can feel good about as they are healthy, I’ve spent countless hours perfecting my black garlic crostini recipe. And yes, I’ve had my share of kitchen fails along the way (like that time I burned an entire batch of baguette slices while helping them with homework!).
If you’re like me and love turning your homegrown garlic into something special, or you’re just looking for an impressive yet easy starter that’ll have your guests asking “What’s in this?”, you’re in the right place. In this guide, I’ll walk you through everything I’ve learned about making perfect black garlic crostini – from selecting the right tools (trust me, a good bread knife makes all the difference) to creating flavor combinations that’ll make you feel like a professional chef.
We’ll cover the fascinating history of this Italian appetizer, dive into the amazing health benefits of black garlic (spoiler alert: it’s great for your immune system!), and I’ll share all my tried-and-true tips for getting that perfect crispy-but-not-too-hard texture. Plus, I’ve included some fool-proof recipes that even my pickiest eaters love.
A Bite-Sized History of Crostini
Cooking is full of little stories, and crostini has a great one. These crispy toasts—effortlessly elegant today—began as a clever way to use up stale bread. Picture it: Medieval Italy, wood-fired kitchens, and grandmothers (much like my kids’ Nana) muttering, “Waste not, want not!”
Meanwhile, across the world, black garlic was working its own quiet magic in Asian cuisine, slowly transforming into something dark, sweet, and impossibly complex. Funny how two traditions—one about resourcefulness, the other about patience—now come together in a single bite. (Curious? Check out Black Garlic: The 2025 Superfood You Need to Try Now!)
Crostini has come a long way from its rustic roots. I like to think of it as the “little black dress” of appetizers—timeless, versatile, and effortlessly stylish. Its chunkier cousin, bruschetta, keeps things more rustic, but here’s where things get interesting: swap fresh garlic for black garlic, and suddenly, that crunch carries a whole new depth—mellow, rich, almost balsamic-like with a whisper of umami. No sharp garlic bite, just pure, mysterious deliciousness.
Tempted to make your own black garlic? All you need is patience—and either a fermenter or a rice cooker. (Here’s my guide to the best fermenters.). But be warned: once you start, you might never stop. Then again, crostini never did either—and centuries later, it’s still the perfect bite, whether at a backyard BBQ or a holiday feast. Some things just belong.
Health Benefits of Black Garlic
You know how some ingredients are like superheros in disguise? Well, black garlic is definitely one of them! While regular garlic is already a nutritional powerhouse, the fermentation process takes things to a whole new level, check out my full post on it. Let me break down why I’m so excited about adding this ingredient to my family’s diet – and why my kids call it “ninja garlic” (because it’s regular garlic dressed in black, get it?).
Let me tell you, as someone who grows their own garlic, discovering black garlic was like finding a secret level-up button! The fermentation process (which isn’t really fermentation at all, but that’s a whole other fascinating story) transforms regular garlic into something truly special. The cloves turn dark and sticky, developing this amazing sweet-savory flavor that’s almost like molasses – but the changes aren’t just about taste!
Here’s what makes black garlic such a nutritional rockstar:
First up: antioxidants. Black garlic packs nearly double the antioxidants of raw garlic—like a two-for-one deal straight from the garden! These little powerhouses help fight off free radicals, keeping your body’s defense system strong.
Then there’s heart health. After my dad’s doctor recommended adding more garlic to his diet, I started paying attention. Black garlic supports healthy cholesterol and blood pressure—without the pungent garlic breath that keeps loved ones at arm’s length!
My favorite benefit? Immune support. Black garlic still has all those sulfur compounds that make garlic great, but in a gentler, more digestible form. (Want some inspiration? Try these recipes: Revolutionize Your Meals with Black Garlic: The Secret Ingredient You’ll Fall in Love With.) I sneak it into pasta sauce, and my kids are none the wiser!
And let’s talk gut health. Black garlic acts as a prebiotic, feeding the good bacteria in your gut. Think of it as fine dining for your microbiome—a happy belly means a happy you.
Best part? No strong garlic bite. Its sweet, mellow flavor makes it easy to add to anything, even for picky eaters. Whether you make your own (Best Black Garlic Fermenters of 2024 has my top picks) or grab some from Killarney Black Garlic, it’s the simplest way to boost flavor and nutrition in your meals.
5 Must-Have Kitchen Tools for Making Perfect Crostini
I learned the hard way: the right tools make all the difference between “meh” crostini and “wow, can I have the recipe?” After years of trial and error, these five essentials are game-changers.
- Serrated Bread Knife – A dull knife means squished, uneven slices. The WÜSTHOF Classic 10″ Bread Knife cuts cleanly without crushing your baguette. Bonus: no need for bodybuilder strength!
- Heavy-Duty Baking Sheet – Uneven toasting? Never again. The Nordic Ware Natural Aluminum Half Sheet distributes heat evenly, so every slice is crisp and golden. Plus, it’s big enough for batch toasting—perfect for surprise guests.
- Pastry Brush – No more bristles in your food! The OXO Good Grips Silicone Brush makes coating bread with olive oil effortless and cleans up in seconds.
- Mini Food Processor – The secret to smooth black garlic paste. The Cuisinart Mini Prep Plus saves time (trust me, mashing black garlic by hand is not fun) and takes up minimal counter space.
- Serving Board – Elevate your crostini from snack to centerpiece. The Lipper International Acacia Board adds a rustic, elegant touch to any spread.
Quick Tip: If you’re making black garlic at home, check out my guide to the Best Black Garlic Fermenters of 2025. But for now, these five tools will set you up for crostini success!
How to Make Black Garlic Paste
Ever since I started [making my own black garlic](link to how to make black garlic post), creating this paste has become a weekend ritual. It’s super easy, stores beautifully, and trust me – once you have this in your fridge, you’ll find yourself adding it to everything!
Ingredients
- 5-6 black garlic cloves, peeled
- 2-3 tablespoons extra virgin olive oil (start with less, you can always add more)
- Pinch of sea salt
- Optional: 1 teaspoon honey (my secret weapon!)
Equipment Needed
- Mini food processor (or mortar and pestle if you’re feeling traditional)
- Spatula
- Airtight container for storage
Instructions
- Prep your black garlic cloves by gently peeling them. Don’t worry if they’re super sticky – that’s totally normal!
- Place your peeled cloves in the food processor. Pro tip: I like to pulse them alone first to break them up a bit.
- Add 2 tablespoons of olive oil and a pinch of salt. If you’re using honey (which I highly recommend – it really brings out the natural sweetness of the black garlic), add it now.
- Pulse until smooth, scraping down the sides as needed. This usually takes about 30-45 seconds. The paste should be spreadable but not runny.
- Check the consistency – if it’s too thick, add more olive oil, one teaspoon at a time. Remember, you can always thin it out but you can’t thicken it up!
Storage Tips
- Transfer to an airtight container
- Will keep in the refrigerator for up to two weeks
- Let it come to room temperature before using for the best spreadability
- Give it a quick stir before each use
Pro Tips
- Want to get fancy? Try adding a splash of balsamic vinegar for extra depth
- If you’re planning to use this in [marinades or sauces](link to cooking with black garlic post), you might want to make it a bit thinner
- Make a double batch – trust me, it disappears fast!
- Label your container with the date (I learned this one the hard way!)
Troubleshooting
- Too thick? Add olive oil, one teaspoon at a time
- Too runny? Add another black garlic clove
- Not spreading smoothly? Let it sit at room temperature for 15 minutes
Bringing It All Together: Black Garlic Crostini Recipe
You know what I love most about this recipe? It’s practically foolproof, yet it looks and tastes like something from a fancy restaurant! After serving these at countless playdates and dinner parties (and tweaking the recipe more times than I can count), I’ve got it down to a science.
Base Ingredients
- 1 fresh baguette, sliced on a diagonal (about 24 slices)
- ¼ cup extra virgin olive oil for brushing
- Black garlic paste
- Sea salt for finishing
Let’s Make Some Magic!
- First things first – crank that oven up to 375°F (190°C). Position your rack in the middle. Trust me, I’ve tried every temperature, and this is the sweet spot for getting that perfect golden crunch!
- Slice your baguette on a diagonal – aim for about ¼ inch thick. Here’s a pro tip I wish I’d known years ago: slightly thicker slices hold up better under toppings than paper-thin ones. Your guests will thank you when they’re not wearing their appetizer!
- Arrange your slices on your baking sheet. A little breathing room between pieces is good – they need space to get crispy! I usually need two baking sheets for a whole baguette.
- Now for my secret to perfectly crispy crostini: brush BOTH sides of each slice with olive oil. Yes, it takes an extra minute, but it’s so worth it! Just don’t soak them – we’re going for light and crispy, not oil-logged.
- Pop them in the oven for 8-10 minutes. But here’s the important part: at around 6 minutes, start watching them like a hawk! They can go from perfectly golden to “oops” in what feels like seconds. (I may have learned this the hard way while helping with homework…)
- Once they’re golden brown, pull them out and let them cool for just a few minutes. They’ll crisp up a bit more as they cool.
- Now for the fun part – spreading that amazing [black garlic paste](link to black garlic cooking guide) you made! Don’t be shy with it; this is where the magic happens.
Pro Tips from My Kitchen to Yours
- Make the crostini base ahead of time! They’ll keep in an airtight container for up to 2 days.
- Serve them slightly warm or at room temperature – not hot! develops better this way.
- If you’re serving these at a party, prep all your ingredients but assemble just before guests arrive. Nobody likes soggy crostini!
Time-Saving Tips for Busy Parents
- Slice your baguette in the morning when you have a few quiet minutes
- Make your black garlic paste up to two weeks ahead
- Keep a batch of plain toasted crostini on hand for last-minute gatherings
Black Garlic Crostini Variation Recipes
If there’s one thing I’ve learned from my crostini-making adventures, it’s that black garlic plays nicely with just about everything! After countless “test kitchen” nights (aka dinner experiments my family graciously endured), I’ve narrowed down our absolute favorite combinations.
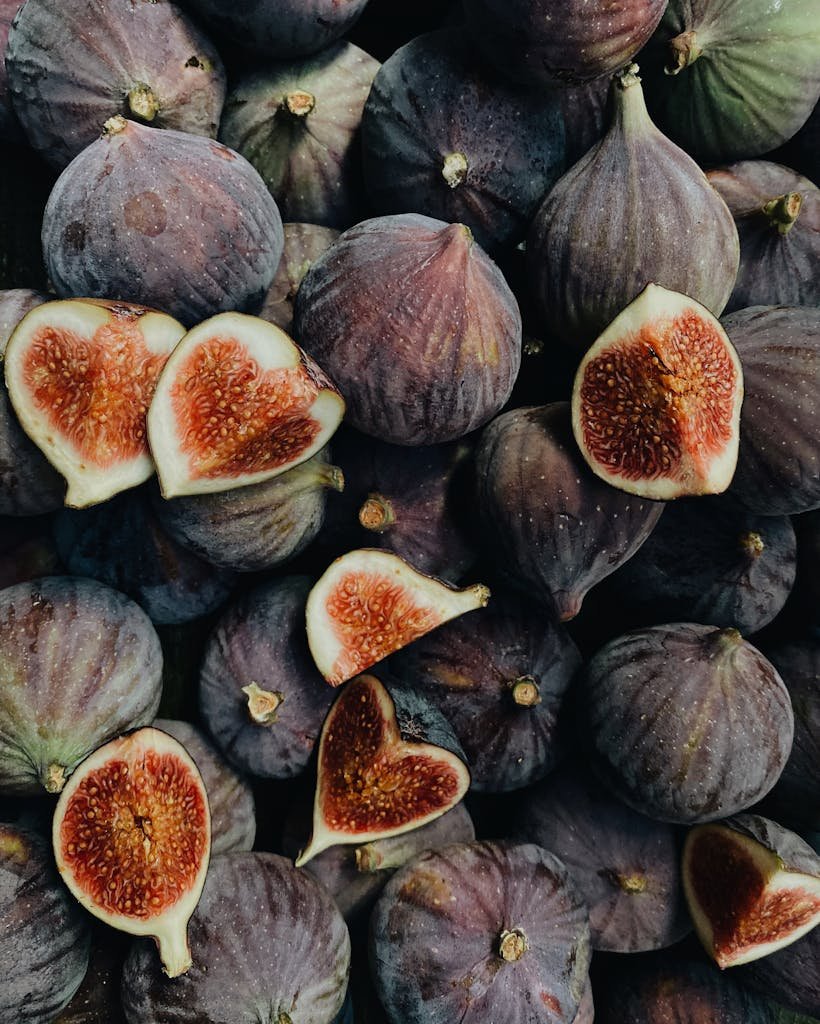
1. Sweet & Savory Black Garlic Fig Crostini
This one’s my go-to when I want to impress without stress! It’s like a fancy cheese board transformed into a single perfect bite.
You’ll Need:
- Prepared crostini base
- Black garlic paste
- Fresh figs (or dried in a pinch!), thinly sliced
- Soft goat cheese
- Local honey for drizzling
- Fresh thyme leaves
Assembly:
- Spread your black garlic paste first – it’s your flavor foundation
- Add a schmear of goat cheese (let it come to room temp for easier spreading)
- Top with a fig slice
- Finish with a tiny drizzle of honey and a sprinkle of thyme
Pro tip: Make this in early fall when figs are in season. Your local farmer’s market is your best friend here!

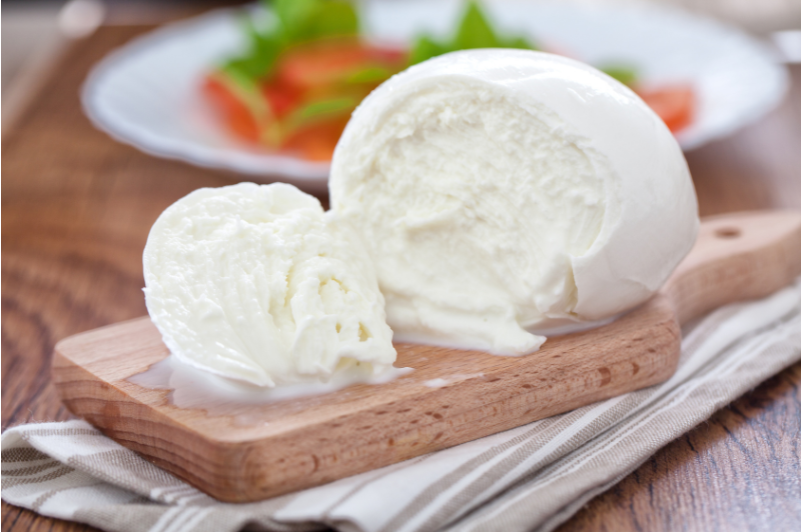
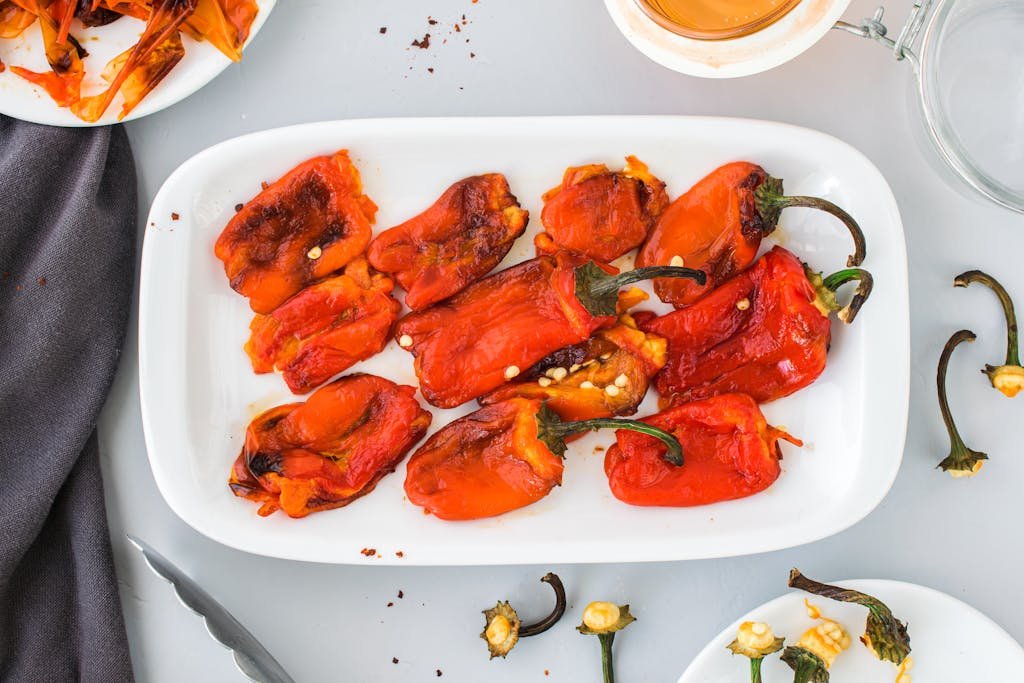
2. Black Garlic Mediterranean Crostini
This one happened by happy accident when I was cleaning out my fridge, and now it’s a family favorite!
You’ll Need:
- Prepared crostini base
- Black garlic paste
- Roasted red peppers, patted dry and sliced
- Fresh mozzarella
- Fresh basil leaves
- Balsamic glaze
- Flaky sea salt
Assembly:
- Spread that magical [black garlic paste](link to black garlic paste recipe)
- Layer on a slice of mozzarella
- Add your roasted pepper
- Top with a small basil leaf
- Finish with a drizzle of balsamic glaze and a tiny pinch of flaky salt
Kitchen Hack: Keep a jar of roasted red peppers in your pantry – they’re a lifesaver for quick appetizers!
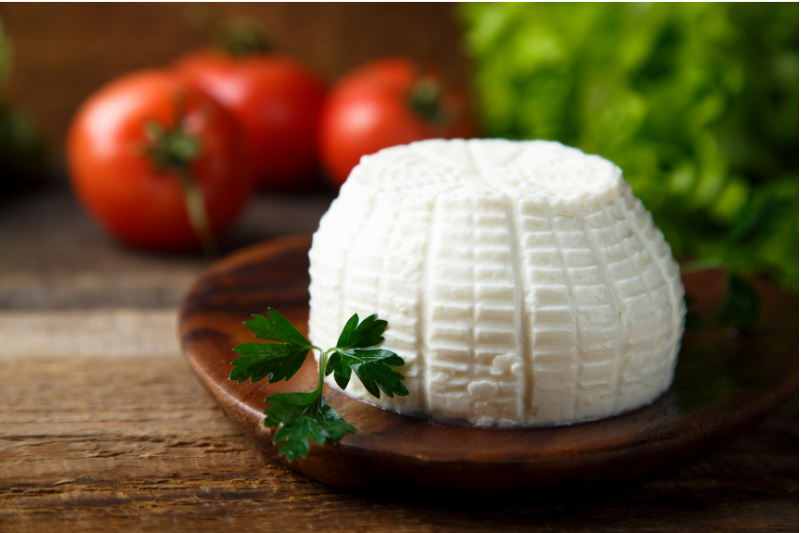
3. Garden Harvest Black Garlic Crostini
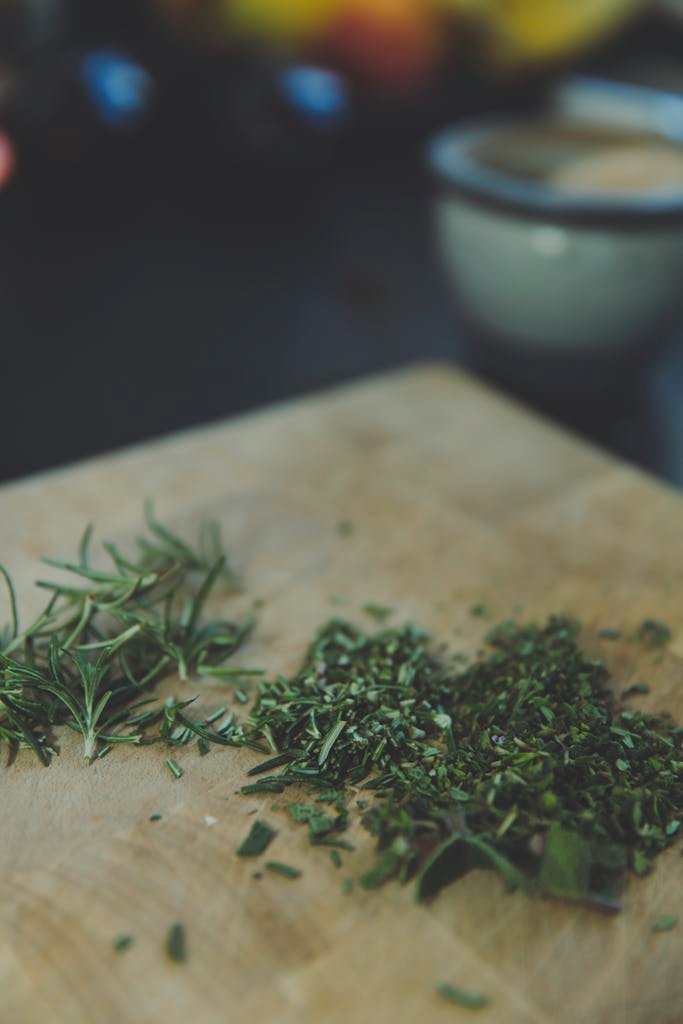
Perfect for when your herb garden is going crazy! This one’s super flexible – use whatever herbs you have growing.
You’ll Need:
- Prepared crostini base
- Black garlic paste
- Mixed soft herbs (I use parsley, chives, and dill)
- Ricotta cheese
- Lemon zest
- Black pepper
- Extra virgin olive oil
Assembly:
- Mix your black garlic paste with room temperature ricotta
- Fold in finely chopped herbs
- Spread on your crostini
- Top with a sprinkle of lemon zest and fresh black pepper
- Finish with a tiny drizzle of your best olive oil
Conclusion
After spending countless weekends experimenting with Black garlic and turning my kitchen into what my kids call “the fancy toast lab”, I can honestly say that crostini-making has become one of my favorite ways to get creative in the kitchen. There’s something magical about transforming simple ingredients into something that makes people’s eyes light up when you serve it!
Remember, the beauty of crostini is that it’s incredibly forgiving. Sure, I’ve shared my favorite combinations, but don’t be afraid to experiment! That random piece of cheese in your fridge? Try it! Garden producing too many cherry tomatoes? Throw them on top! Black garlic plays well with almost everything.
A few final tips from my kitchen to yours:
- Make extra black garlic paste – you’ll find yourself wanting to spread it on everything
- Keep your crostini base recipe handy – it’s perfect for any topping inspiration that strikes
- Don’t stress about perfection – even the “ugly” ones taste amazing
- Have fun with it! The best recipes often come from happy accidents
I’d love to hear about your black garlic crostini adventures! Drop a comment below with your favorite combinations, or tag us in your crostini creations on social media. And if you’re feeling inspired to dive deeper into the world of black garlic, check out our guides on ‘Black Garlic: The 2025 Superfood you need to try now!’ or exploring different ways to use it ‘Revolutionize Your Meals with Black Garlic: The Secret Ingredient You’ll Fall in Love With‘ in your kitchen.
Now, if you’ll excuse me, I’ve got some crostini to make – the neighbors are coming over, and they’ve been not-so-subtly hinting for these all week!