

Hey there, garden enthusiasts! You won’t believe this, but Jerusalem artichokes can produce an amazing 200 tubers from just one plant – talk about getting the most bang for your money!
I’ve been growing these fantastic vegetables in my garden for years, and I’m still amazed by how easy they are to maintain. You might hear people call them sunchokes, and there’s a good reason for that – they’re actually related to sunflowers, not artichokes!
These plants are like the superheroes of the vegetable world, standing tall and proud while producing delicious, nutritious tubers underground. If you’re looking to add something new to your garden this year, you’re in for a treat. Whether you’re a beginner just starting out or an experienced gardener looking to try something different, Jerusalem artichokes are a fantastic choice.
They’re super forgiving if you make mistakes, and they’ll reward you with an abundant harvest that’ll make you feel like a gardening pro. Plus, they’re packed with nutrients that are great for your health. Trust me, once you start growing these amazing plants, you’ll wonder why you didn’t try them sooner!
Understanding Jerusalem Artichokes
Let’s dive into the fascinating world of Jerusalem artichokes, which have a pretty interesting backstory.
Native Americans were actually the first to cultivate these plants, and they’ve been growing them for hundreds of years before European settlers arrived. Here’s something that might surprise you – the name “Jerusalem artichoke” is kind of a funny mistake! These plants aren’t from Jerusalem at all, and they’re definitely not artichokes. The name probably came from Italian settlers who called them “girasole” (which means sunflower in Italian), and somehow that got twisted into “Jerusalem” over time.
When it comes to varieties, you’ve got some cool options to choose from – some produce smoother tubers that are easier to clean, while others have knobby ones that look like ginger root. The plants themselves are pretty impressive, often growing as tall as 10 feet, with cheerful yellow flowers that look just like mini sunflowers.
Throughout the growing season, you’ll get to watch them go through different stages, from tiny sprouts in spring to towering giants by late summer. The really exciting part happens underground, where the tubers start forming as the days get shorter in late summer.
One of the coolest things about these plants is that they’re basically like a time capsule – once you plant them, they’ll come back year after year if you leave any tubers in the ground. That’s why some gardeners call them the “gift that keeps on giving!”
Choosing the Perfect Growing Location
Finding the right spot for your Jerusalem artichokes is super important, but don’t worry – it’s not as complicated as it might sound! These plants are pretty easy-going, but they do have a few things they really love.
First up, they’re total sun worshippers – give them 6-8 hours of direct sunlight, and they’ll be as happy as can be. You might be surprised to learn that these plants can grow in almost any soil type, but they do best in well-draining soil that’s not too heavy with clay.
Here’s a pro tip: think about where you’re putting them carefully because these plants can get really tall – we’re talking basketball player height! You’ll want to place them somewhere where they won’t shade out your other garden plants. Space is another big thing to think about – these plants like to spread out and make themselves at home. Give each plant about 2-3 feet of space to grow, and trust me, they’ll use every inch of it!
Some gardeners like to plant them along property lines or in areas where they can create a natural privacy screen. Just keep in mind that Jerusalem artichokes can be pretty enthusiastic growers – they might even try to take over your garden if you let them! That’s why many experienced gardeners recommend planting them in contained areas or using barriers to keep them from spreading too much. Don’t forget about access either – you’ll want to be able to get to your plants easily for maintenance and harvesting.
Soil Preparation and Planting
Getting your soil ready for Jerusalem artichokes is kind of like preparing a cozy bed for them to grow in! I always start by checking the soil pH – these plants aren’t too picky, but they really love soil that’s slightly acidic to neutral, around 6.0 to 7.0.
Don’t worry if this sounds technical – you can get simple soil testing kits from any garden center. Before planting, I like to dig the soil about a foot deep and mix in some compost – it’s like giving your plants a welcome snack!
The best time to plant is usually in early spring, right when the soil is starting to warm up.
Here’s a cool trick I learned: cut your seed tubers into pieces about the size of an egg, making sure each piece has at least one “eye” (that’s like a little bump where the plant will sprout from). Plant these pieces about 4-5 inches deep – think about the length of a pencil.
Some gardeners swear by soaking the tubers in water overnight before planting, but I’ve had great success either way. Remember to space your plants about 15-18 inches apart in rows that are 3-4 feet apart – trust me, they’ll need this space once they start growing! The best part? You don’t have to be super precise with the planting – these plants are really forgiving and will usually find their way no matter what.
Jerusalem Artichoke Varieties
Here’s a comprehensive list of Jerusalem artichoke varieties and their best uses:
- Stampede
- Best for: Beginner gardeners
- Features: Smooth, round tubers
- Benefits: Easy to clean and prepare
- Yield: High productivity
- Growing notes: Less aggressive spreading than other varieties
- French Mammoth White
- Best for: Commercial growing and bulk harvesting
- Features: Large, white tubers
- Benefits: Excellent storage capability
- Yield: Very high
- Growing notes: Needs plenty of space due to size
- Fuseau
- Best for: Kitchen preparation and processing
- Features: Long, straight tubers with minimal knobs
- Benefits: Easy to peel and clean
- Yield: Moderate to high
- Growing notes: More upright growth habit
- Red Fuseau
- Best for: Cold climates
- Features: Red-skinned tubers
- Benefits: Enhanced cold hardiness
- Yield: Good even in shorter seasons
- Growing notes: Excellent winter survivability
- White Devaux
- Best for: Small gardens
- Features: Smooth, round tubers
- Benefits: Less aggressive spreading
- Yield: Moderate
- Growing notes: Better behaved in garden settings
- Gerard
- Best for: Ornamental and edible gardens
- Features: Exceptional flower display
- Benefits: Dual-purpose (beautiful flowers and edible tubers)
- Yield: Moderate
- Growing notes: Excellent pollinator attractor
- Jerusalem White
- Best for: Traditional gardens and long-term storage
- Features: Classic heritage variety
- Benefits: Reliable producer
- Yield: Consistent
- Growing notes: Time-tested variety with predictable growth
- Dwarf Sunray
- Best for: Small spaces and container growing
- Features: Compact growth (6 feet tall)
- Benefits: More manageable size
- Yield: Lower but sufficient for home gardens
- Growing notes: Ideal for urban gardens or tight spaces

Essential Care and Maintenance
Taking care of Jerusalem artichokes is pretty straightforward – they’re kind of like the low-maintenance friends of the garden world!
When it comes to watering, these plants are pretty chill during their first few weeks of growth. Once they start getting taller, you’ll want to give them a good drink of water about once a week, or more often if you live somewhere really hot and dry. Here’s something cool – once their roots get established, these plants are surprisingly drought-tolerant!
Fertilizing is super simple too – I usually just add a layer of compost around the plants in early summer, and that’s usually enough to keep them happy. One thing you’ll definitely notice is how tall these plants get – they can shoot up to 10 feet or more! Some gardeners like to stake their plants to keep them from flopping over, but I’ve found that planting them close enough together helps them support each other, like a little plant community.
Weeding is most important in the early stages before the plants get big enough to shade out the competition. Once they’re tall, they pretty much take care of weed control on their own. You might notice some yellow leaves at the bottom of the plants as they grow – this is totally normal, just remove them to keep things tidy. The best part about caring for Jerusalem artichokes is that they’re really not fussy – they’ll usually let you know if they need something by showing signs like drooping leaves if they’re thirsty.

Managing Common Challenges
Let’s talk about keeping your Jerusalem artichokes healthy and happy – it’s easier than you might think! One of the coolest things about these plants is that they don’t usually get too bothered by pests or diseases.
However, you might spot some aphids hanging out on the leaves now and then – a strong spray of water usually takes care of them, no fancy pesticides needed! Sometimes you might notice some spots on the leaves, especially in really wet weather. Don’t panic – this is usually just a fungal issue that you can prevent by making sure your plants have good air circulation. If you live in an area with deer, you might find these four-legged visitors checking out your garden – they actually love Jerusalem artichoke leaves!
A simple fence or some netting can help protect your plants. Some gardeners worry about the plants spreading too much, but there’s an easy fix – just make sure you harvest thoroughly in the fall, and dig a shallow trench around your planting area to catch any wandering tubers.
You might also notice that your plants start flopping over when they get really tall – this is super common and usually not a big deal. If it bothers you, just tie them loosely to some stakes, kind of like giving them a helping hand to stand up straight. The most important thing to remember is that these plants are super resilient – they’ve been growing wild for centuries and can handle almost anything nature throws at them!
Companion Planting with Jerusalem Artichokes
Let me share some garden wisdom about companion planting with Jerusalem artichokes – these tall beauties can actually be fantastic neighbors to many other plants!
Your sunchokes can provide natural support for climbing plants like pole beans, while low-growing herbs such as oregano and thyme make perfect ground cover around their base. I’ve had great success planting quick-growing leafy greens like lettuce and spinach near young sunchoke plants, harvesting them before the sunchokes get too tall and shady.
However, keep in mind that some plants aren’t great matches – avoid planting tomatoes, potatoes, or other root crops nearby, as they’ll compete for nutrients and space.
The best companion planting strategy is to think in layers: tall sunchokes on top, climbing plants in the middle, and low-growing plants at ground level. This setup not only maximizes your garden space but also creates a mini ecosystem where beneficial insects thrive and plants help protect each other.
Just remember to give your sunchokes enough room to grow, as they can reach impressive heights and may shade out sun-loving neighbors. For the best results, try planting pollinator-friendly flowers like marigolds and zinnias nearby – they’ll attract helpful insects while adding beautiful colors to your garden. Plus, using ground covers like clover around your sunchokes helps suppress weeds and keeps the soil healthy, making your garden maintenance much easier.
Harvesting and Storage
Harvesting Jerusalem artichokes is like going on a treasure hunt in your garden – it’s seriously fun! The best time to start digging up your tubers is after the first frost has hit and the plants start to die back. This usually happens in late fall or early winter, depending on where you live.
Here’s a pro tip: mark your plants well before they die back, because it can be tricky to remember exactly where they are once all the foliage is gone! When you’re ready to harvest, grab a garden fork (it works better than a shovel) and gently dig around the plants in a circle about a foot away from the stem.
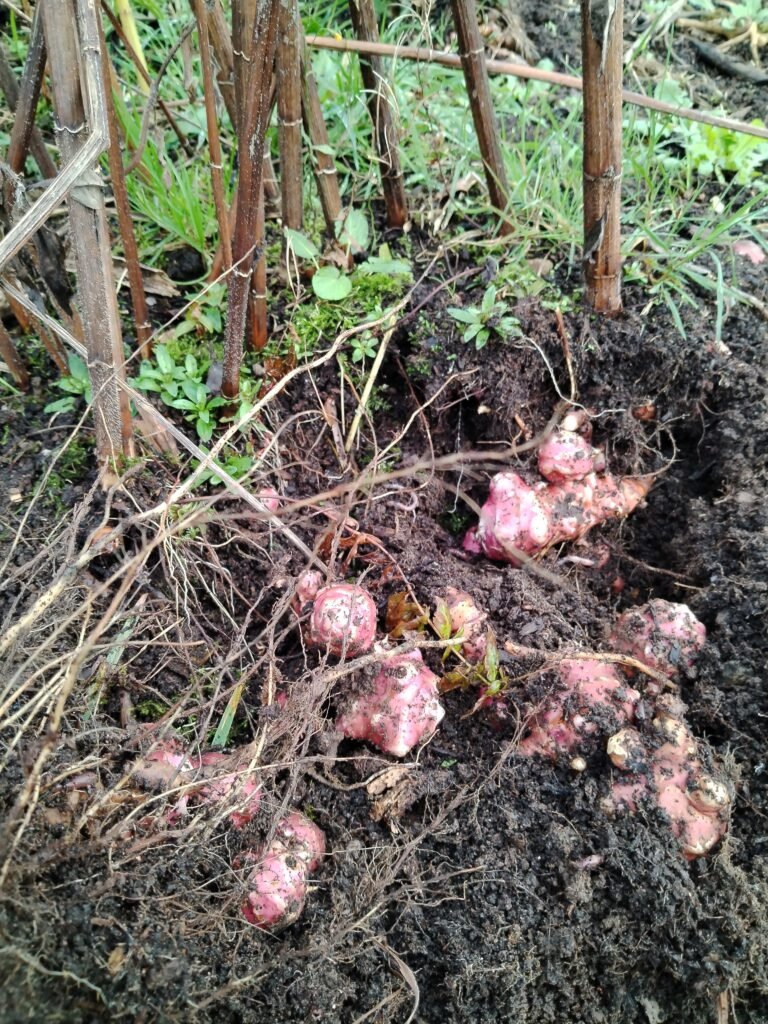
You’ll be amazed at how many tubers you find – they kind of look like giant knobby ginger roots! The really cool thing about harvesting is that you don’t have to dig them all up at once. These tubers actually store best right in the ground, and the flavor gets better after a frost.
When it comes to storing the ones you do dig up, clean them gently (don’t wash them unless you’re using them right away), and keep them in a plastic bag in your fridge’s crisper drawer. For longer storage, you can keep them in a root cellar or cool basement in slightly damp sand – they’ll stay fresh for several months this way!
Conclusion
Well, there you have it, fellow gardeners – everything you need to know to grow your own amazing crop of Jerusalem artichokes! I hope you’re as excited as I am about starting this gardening adventure.
Remember, these plants are incredibly forgiving and perfect for both newbie gardeners and experienced green thumbs. The best part is that once you plant them, you’re setting yourself up for years of harvests – talk about a gift that keeps on giving! Don’t be afraid to experiment with different varieties and growing methods to find what works best in your garden.
If you’re worried about making mistakes, just remember that these plants have been growing wild for centuries – they’re pretty much experts at taking care of themselves. Before you know it, you’ll be harvesting your own bumper crop of nutritious tubers and sharing tips with other gardeners. So what are you waiting for? Grab some seed tubers, pick a sunny spot in your garden, and get ready to grow one of the most rewarding vegetables out there. Trust me, once you taste your first home-grown Jerusalem artichoke, you’ll be hooked! Happy gardening, and here’s to your successful sunchoke adventure in 2025!

