DIY wicking beds are one of the easiest ways to grow a garden that takes care of itself. Really—it waters from the bottom up, just like nature planned. If you’ve ever forgotten to water your plants (we all do), or you’re tired of watching your hard work dry out in a heatwave, this simple setup might be just what your garden needs.
I first came across wicking beds when we were dealing with a dry summer and droopy tomatoes. No matter how much I watered, it never seemed like enough. That’s when I discovered this clever, self-watering system. We built our first one out of an old IBC tank, and the difference was night and day. Less watering, less stress, and way more lettuce!
Wicking beds work by holding water in a reservoir under the soil. The moisture wicks up through the soil as the plants need it, which means you use way less water—and your garden stays happily hydrated even when life gets busy.
They’re perfect for raised beds, tubs, buckets, or even repurposed barrels. Whether you’re gardening on a patio, a field, or a windowsill, this method is super flexible and beginner-friendly.
In this post, I’ll show you exactly how they work, how to build your own, what to plant, and a few mistakes to avoid. Once you try it, you’ll wonder why you didn’t make a wicking bed sooner. Let’s dig in, shall we?
How Do Wicking Beds Work? A Look Inside the Self-Watering Magic
If you’re wondering how this all works, don’t worry—it’s not complicated. Wicking beds are like giving your plants a little underground water bottle they can sip from whenever they’re thirsty. Pretty clever, right?
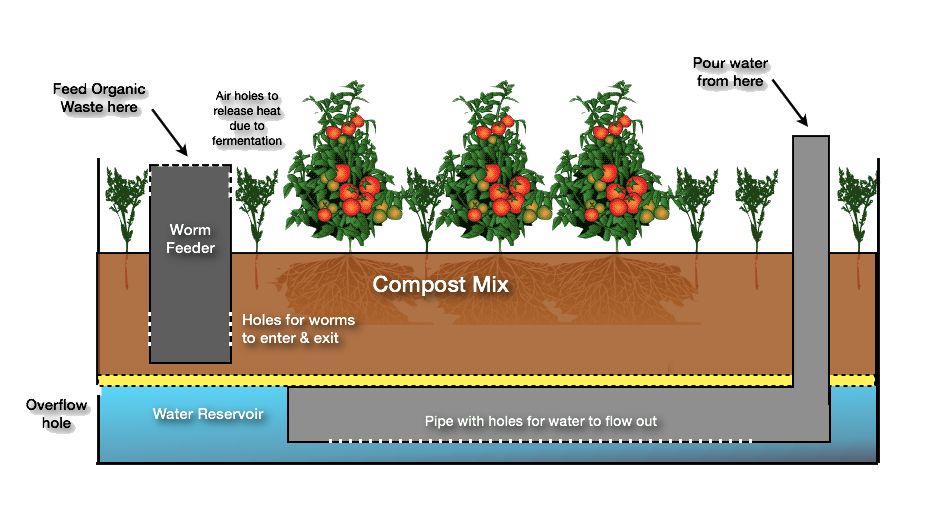
Here’s the basic idea: there’s a water reservoir at the very bottom of the bed. This holds extra water, kind of like a sponge. Then there’s a layer of soil on top where your plants grow. Between those two layers, there’s something that helps pull the water upward—this is called capillary action. It’s the same way a paper towel soaks up a spill.
So, instead of watering from the top and hoping it reaches the roots, the moisture comes up from the bottom when the plant needs it. That means less waste, less evaporation, and fewer sad, wilted leaves. It also means fewer weeds, because you’re not watering the topsoil as much!
To keep things running smoothly, there’s a little overflow pipe on the side of the bed. This lets out any extra water so your roots don’t get soggy. Some folks even add a worm tube or compost pipe in the middle to feed the soil while it waters itself. Handy, right?
Up next, we’ll look at what you need to build one from scratch—no fancy tools or big budget needed!
Benefits of Using Wicking Beds in Your Garden
Saves Water and Time (Perfect for Dry Climates)
Wicking beds hold water in a hidden reservoir under the soil. This means your plants can drink what they need when they need it — kind of like a self-serve drink station! You don’t have to water every day, which saves time and makes them perfect for hot or dry areas.
Promotes Deeper Root Growth and Healthier Plants
Because the water is stored down low, your plants grow deeper roots to reach it. Deeper roots mean stronger plants! They can handle heat better and stay healthy even when it doesn’t rain for a while.
Reduces Surface Evaporation and Weeding
The top layer of soil in a wicking bed stays pretty dry. That means less water gets stolen by the sun, and weeds don’t pop up as much. Less weeding? Yes, please!
Minimizes Common Problems Like Over- or Under-Watering
It’s easy to overdo it or forget to water, right? Wicking beds help keep the water level just right, so your plants don’t drown or dry out. It’s like having a built-in helper.
Increases Garden Yield with Less Effort
Healthy roots, steady water, and fewer weeds all add up to more food from your garden. Many gardeners say their veggies grow bigger and taste better when using a wicking bed — and they barely have to fuss with them!
How to Build a DIY Wicking Bed (Step-by-Step Guide)
Building your own wicking bed might sound tricky, but it’s actually pretty easy — and fun! With just a few basic supplies and a little know-how, you can set up a low-maintenance garden that practically waters itself. Let’s walk through it step by step.
Materials List: Pond Liner, Gravel, PVC Pipe, Soil Mix, and More
Here’s what you’ll need before you get started:
- A pond liner or heavy-duty plastic sheet (to hold the water)
- Gravel or small rocks (for the reservoir)
- A piece of PVC pipe or ag pipe (for watering)
- An overflow pipe (to prevent flooding)
- A good-quality soil mix
- A container or raised bed to hold it all
Gather everything ahead of time so the build goes smoothly!
Choosing the Right Container (Raised Beds, Barrels, Tubs)
You can turn almost any watertight container into a wicking bed. Raised garden beds work great, but old bathtubs, wine barrels, or even big storage tubs can do the job too. Just make sure whatever you use is deep enough for all the layers — about 30–40 cm (12–16 inches) works well.
Creating the Water Reservoir Layer
The first layer is your water reservoir. Lay the pond liner at the bottom of your container to hold the water. Then, fill it with gravel or coarse rocks up to about one-third of the height. This is where the water will sit, ready for your plants to drink from below.
Installing the Wicking Layer and Overflow Pipe
Next, insert a piece of PVC pipe standing upright from the bottom corner — this is where you’ll add water later. Then, drill a small hole in the side of the container at the same height as your gravel — this is your overflow outlet, so the bed doesn’t flood when it rains. Add a layer of landscape fabric over the gravel to keep the soil from mixing in.
Filling with Soil and Planting
Now, fill the rest of the bed with your soil mix — rich, loose, and full of compost is best. Once it’s filled, plant your favorite herbs, veggies, or flowers! Water from the top once to get everything started. After that, just top up the reservoir when needed.
Best Plants for Wicking Beds
Wicking beds are like a cozy self-watering home for your plants. Because they keep the soil moist from below, they’re perfect for certain crops that love consistent water. Let’s look at the best things to plant — and a few to skip.
Vegetables That Thrive (e.g., Tomatoes, Lettuce, Herbs)
Some vegetables absolutely love growing in wicking beds. Tomatoes, lettuces, spinach, basil, mint, and parsley are great choices. These plants enjoy steady moisture, and in a wicking bed, they don’t dry out quickly — even on hot summer days. You’ll likely notice faster growth and happier leaves!
Perennial and Edible Plants That Benefit from Constant Moisture
Perennial herbs like oregano, thyme, and chives do well here too. So do strawberries, rhubarb, and even dwarf fruit trees in larger beds. If you live in a warm climate, try ginger or turmeric. These kinds of plants don’t like drying out between watering, so they’re perfectly matched to this system.
What to Avoid Planting in a Wicking Bed
Not every plant loves wet feet. Root crops like carrots and potatoes can struggle if the soil stays too damp. Also, Mediterranean herbs like rosemary and lavender prefer dry, sandy soil — so they’re better off in regular garden beds or pots. If in doubt, check if your plant likes moisture or needs good drainage.
Seasonal Rotation Tips for Optimal Harvests
To keep your wicking bed productive all year, rotate crops with the seasons. Leafy greens and brassicas (like kale and broccoli) do great in cooler months, while summer is perfect for tomatoes, cucumbers, and peppers. After each season, add compost to refresh the soil. That way, your plants always have the nutrients they need to thrive.
Common Mistakes to Avoid with Wicking Beds
Wicking beds are easy once you get the hang of them — but a few simple mistakes can stop your garden from doing its best. Here’s what to watch out for so your wicking bed stays healthy and happy!
Using the Wrong Soil Mix (Why Loam + Compost Matters)
Good soil is the heart of any garden, and wicking beds are no different. If the soil is too sandy, it won’t hold enough water. If it’s too heavy like clay, water won’t move up easily to the roots. A mix of loam and compost is just right! It holds moisture but still lets roots breathe. Add a bit of coco coir for extra sponge-like action.
Skipping the Overflow Pipe
This little pipe does big work. Without it, your water reservoir can flood into the soil layer — and that’s a big no-no. Plants can drown or rot if the roots sit in too much water. The overflow pipe keeps everything balanced, letting extra water drain out once it reaches the right level.
Poor Container Choice or Drainage Setup
Choosing the wrong container — or skipping a drainage layer — can lead to soggy soil or dry patches. Raised beds, old bathtubs, and big tubs work great, as long as they’re lined properly and have a good gravel base for drainage. Don’t forget to seal any leaks!
Overfilling the Water Reservoir
It might seem like more water equals better results, but too much of a good thing can cause root rot. Fill the reservoir until water just starts to come out of the overflow pipe — and stop there. That’s the sweet spot.
Ignoring Maintenance (Checking Levels, Topping Up Water)
Even low-maintenance gardens need a little check-up. Every week or so, take a peek at the reservoir. Is it dry? Time to fill. Are your plants looking droopy? Check for clogs in the pipe. A few minutes of care keeps everything thriving.
Maintenance Tips and Troubleshooting
Even though wicking beds are low-maintenance, they’re not set-it-and-forget-it forever. With just a little regular care, your garden will keep growing strong. Let’s go over what to look for and how to fix common problems!
How Often to Refill and Monitor the Reservoir
First things first — keep an eye on the water level. In summer, you might need to top it up every few days. But in cooler or rainy weather, once a week could be plenty. A simple dipstick (like a bamboo stick) helps you check if the water’s low. If it’s dry past the gravel line, it’s time to refill!
Signs Your Wicking Bed Isn’t Working (Wilting, Root Rot)
Sometimes, even with the best setup, things go wrong. Are your plants wilting even when there’s water? It could mean the soil is too compact or roots aren’t reaching the moisture. On the other hand, yellowing leaves or a funky smell might mean root rot — usually from too much water. Adjust the soil mix or check your overflow pipe to help balance things out.
Seasonal Care: What to Do in Winter or Dry Summers
Next up, let’s talk about seasons. In summer, refill more often and add mulch to keep soil cool. During winter, you won’t need to water as much — but do check the reservoir once in a while. If your winters freeze, consider emptying the bed to protect your pipes and liner from cracking.
Preventing Mosquitoes and Algae Build-Up
And finally, nobody wants bugs or slimy green stuff! To stop mosquitoes, make sure your water inlet is covered with mesh or a cap. That way, they can’t get in to lay eggs. For algae, shade the water inlet or add a splash of vinegar now and then — just enough to discourage growth without harming plants.
Wicking Beds for Small Spaces and Urban Gardening
You don’t need a big backyard to grow your own food. In fact, wicking beds are perfect for tight spaces — even if all you have is a sunny balcony! Let’s take a look at some clever ways to make them work in small or urban gardens.
Using Wicking Beds on Balconies, Patios, and Rooftops
First of all, wicking beds are ideal for places where water drains quickly or where regular watering is a hassle. That’s why they’re so popular on balconies, patios, and even rooftops! Just make sure the container isn’t too heavy for your space. Lightweight options or placing beds near a wall for support can help.
Creative Containers for Tight Spaces (Buckets, Totes, Bathtubs)
Next, let’s talk containers. You don’t need fancy raised beds to get started. Buckets, old storage totes, and even upcycled bathtubs make great wicking beds! As long as it can hold water and has room for gravel and soil layers, you’re good to go. These are fun to decorate, too — add a little charm with paint or stencils.
Apartment and Rental-Friendly Setups
If you’re renting or in an apartment, don’t worry. You can build portable wicking beds that don’t damage floors or walls. Try placing them on trays or wheels for easy movement. That way, you can catch overflow and protect your space. Plus, you can take them with you if you move!
Vertical and Modular Wicking Systems
Lastly, if space is extra tight, go up instead of out. Vertical and stackable wicking beds help you grow more in less space. Think towers of lettuce or strawberries in stacked crates. Modular systems are also great for customizing your space — add or remove units as needed!
How They Compare to Drip Irrigation and Ollas
Drip irrigation and ollas (those clay pots buried in the soil) are both great ways to save water. But wicking beds have a secret superpower: they water from the bottom up! This means your plants only take what they need—no soggy soil or wasted water. Unlike drip systems that can clog or need timers, wicking beds are simple and low-tech. And ollas? They’re lovely but don’t hold much water, so you need quite a few for a big bed. If you want a set-it-and-forget-it kind of system, wicking beds are hard to beat.
Pros and Cons of Wicking Beds vs. Mulch-Heavy Gardening
Mulch helps lock in moisture and keeps weeds away, which is wonderful. But it can’t store water the way a wicking bed does. A wicking bed acts like a sponge—storing water underground where it doesn’t evaporate. That said, mulch is cheaper and faster to use in a pinch. Some folks even do both: mulch on top of a wicking bed! That way, you double up on water savings and keep your garden extra happy.
Integrating Wicking Beds into Permaculture or No-Dig Systems
Wicking beds fit beautifully into permaculture or no-dig gardens. They save water, build healthy soil, and reduce the need for weeding—win, win, win! You can grow veggies in wicking beds while using no-dig beds for herbs and perennials. Together, they create a diverse and balanced garden that works with nature, not against it.
When Not to Use a Wicking Bed
Sometimes, a wicking bed isn’t the best choice. If you get heavy rains often or have super soggy soil, they might stay too wet and cause root rot. Also, if you’re planting crops with shallow roots or those that dislike constant moisture (like some Mediterranean herbs), regular raised beds might be better. Know your plants, and pick the method that suits them best!
Final Thoughts: Why Wicking Beds Might Just Be Your Garden’s Best Friend
So, if you’re tired of dragging hoses around or worrying about your garden drying out, wicking beds could be the answer. They’re simple to build, easy to care for, and great at saving water—what’s not to love? Plus, they’re perfect if you’re just starting out, or even if you’ve been gardening for years and want to try something new.
Even better, wicking beds help plants grow strong roots and stay healthy with less fuss. That means more time enjoying your garden and less time worrying about it. Whether you live in the countryside or on a small city balcony, there’s a wicking bed style that’ll work for you.
And don’t forget—making a wicking bed is a fun weekend project. You don’t need fancy tools or special skills. Just a few materials, a bit of patience, and maybe a nice cup of tea to sip while you work.
In the end, gardening should make you feel calm, proud, and connected to nature. Wicking beds do just that. So why not give one a try? Your plants will thank you—and so will your water bill.
Want to keep this info close by? Grab the free printable guide below and start building your own low-maintenance garden magic today.