

There’s nothing quite like a comforting elderberry cordial —a deep, velvety sip that feels like a warm hug on a chilly evening. We used to spend autumn afternoons foraging along country lanes, baskets in hand, fingers stained purple as we gathered elderberries for this rich, spiced elixir. But year after year, our supply barely lasted the winter. Friends and family started requesting bottles, and before we knew it, we were brewing batch after batch, our stock disappearing faster than we could collect the berries.
So, in a bid to shorten the hours spent scouring the hedgerows, we brought the hedgerows to us. We planted elderberry bushes right here on the farm, letting them stretch their roots deep into our soil. Now, instead of trekking miles to gather enough for a season’s worth of cordial, we step outside and harvest armfuls of glossy, ink-dark berries just a few steps from the kitchen.
And let me tell you—once you start making elderberry cordial at home, you’ll never want to be without it. It’s the kind of thing you instinctively reach for when the air turns crisp, when a scratchy throat sneaks up on you, or when you simply crave a touch of old-world comfort. Sweet, spiced, and brimming with goodness, this is more than just a drink—it’s a tradition in a bottle.
(This blog post contains affiliate links. Purchasing through these links may provide me with a small commission at no extra cost to you.
Thank you!)
Why Elderberries Have Been a Trusted Remedy for Generations
Elderberries have been cherished for centuries, not just for their deep, wine-dark beauty but for their incredible ability to support wellness. Long before they found their way into syrup bottles and herbal tinctures, they were brewed into tonics by wise grandmothers and village healers, passed down as a remedy for the sniffles, chills, and the general weariness that comes with long winters. Modern science has only confirmed what folklore has long whispered—elderberries are packed with immune-boosting antioxidants, vitamin C, and flavonoids that help the body fight off seasonal woes.
Their antiviral properties make them a go-to during colder months, supporting the body’s natural defenses. Some studies suggest that elderberry extract can reduce the duration and severity of colds and flu, while its anti-inflammatory compounds may help soothe sore throats and ease congestion. But beyond the science, there’s something undeniably comforting about sipping a warm mug of elderberry cordial when you’re feeling under the weather. It’s a ritual of care—one that wraps you in the wisdom of the past and a little homemade magic.
And because elderberries are also rich in anthocyanins, they don’t just support immunity; they promote heart health, reduce oxidative stress, and may even play a role in balancing blood sugar. So whether you’re pouring a splash into hot water for a soothing tea or mixing it into a refreshing drink, elderberry cordial is more than just a treat—it’s a time-honored tonic for body and soul.
Essential Safety Guidelines for Elderberry Foraging
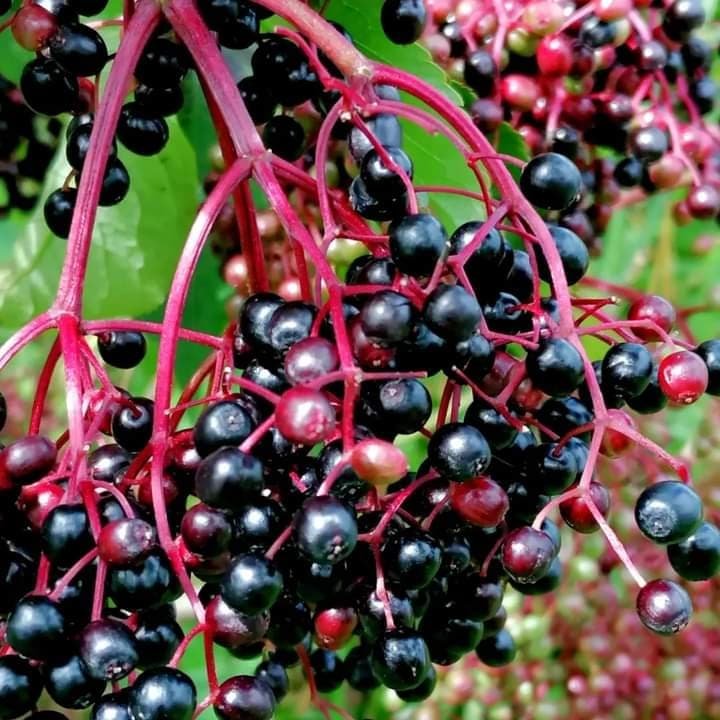
First things first – identification is absolutely crucial. True elderberries (Sambucus nigra) have some distinctive features that you’ll want to burn into your memory. The berries grow in flat or slightly dome-shaped clusters that point upward, unlike their toxic lookalike, pokeweed, which has berries that hang down in drooping clusters. The elderberry shrub itself can grow quite tall – I’ve seen some reach 20 feet! The ones we planted 2 years ago and were only a stick are almost 2 1/2 meters high already! Look for eye-shaped leaves that grow on a branch opposite each other, normally 2 – 3 pairs on a branch, and those beautiful cream-colored flower clusters in late spring that transform into the berries we’re after.
Here’s a safety tip: there’s a reason experienced foragers call the plant “Elder.” It demands respect! Every part of the elderberry plant except the fully ripe berries contains compounds that can make you pretty uncomfortable – I’m talking nausea, vomiting, and a rather unpleasant day overall. The stems, leaves, unripe berries, and especially the bark contain cyanogenic glycosides. So we ONLY use the fully ripe berries, and yes, they must be cooked before consuming. Those gorgeous purple-black clusters are what we’re after – if they’re red or green, keep walking!
Timing is everything in elderberry foraging. You’re looking for those deep purple-black berries that are practically begging to fall off their stems. I typically start checking in late August. A little trick I learned is: give the cluster a gentle shake – if the berries are ready, they’ll practically jump into your basket!
Speaking of baskets, let’s talk equipment.
My foraging kit has evolved quite a bit since that first plastic bag adventure. Here’s what I never leave home without:
- A breathable cloth bag (plastic bags make berries sweat and spoil faster). There is some great versions out there these days like apron bags, so you have your hands free!
- Sharp pruning shears (much gentler on the plant than pulling)
- Thick gloves (elderberry juice stains are no joke – trust me on this one!)
- A small first-aid kit (thorns happen to the best of us)
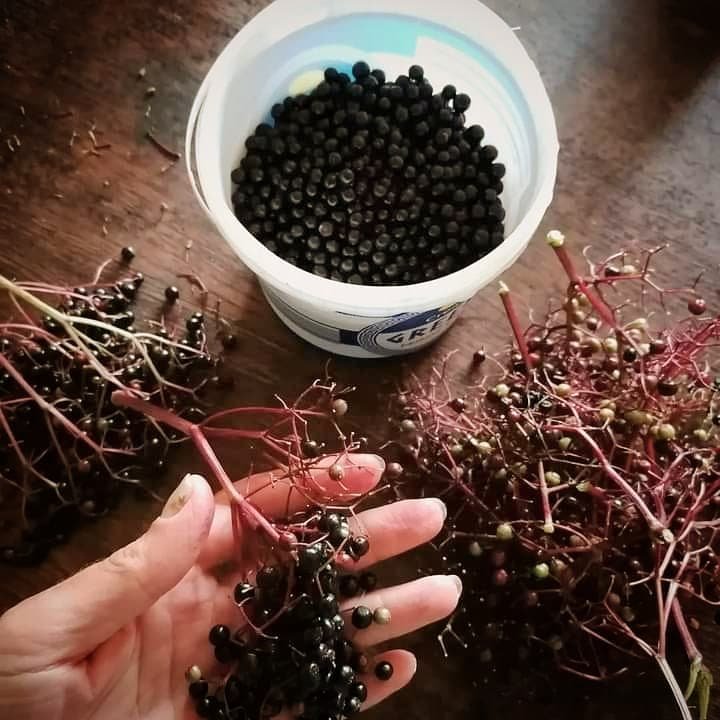
Proper handling is crucial once you’ve gathered your bounty. Keep your containers no more than a few inches deep to prevent crushing, and try to process them within 24 hours. If you can’t get cooking immediately, spread them out on a tray in your refrigerator – don’t leave them in a deep container where they might start fermenting. I always leave about a third of the berries on each bush. It’s not just good foraging etiquette; it’s crucial for local wildlife and ensuring next year’s harvest.
I can’t stress enough how important it is to document your foraging spots. Keep a simple notebook with locations, dates, and photos. This helps not only to track the best harvesting times but also ensures I’m returning to spots where I’ve positively identified safe elderberry bushes. Last year, I found what I thought was a new elderberry patch, only to realize it was actually a water hemlock bush with similar berry clusters – that notebook saved me from a potentially dangerous mistake!
Remember, when in doubt, always err on the side of caution. It’s better to come home empty-handed than to risk harvesting the wrong plant. And if you’re new to foraging, consider joining a local foraging group or taking a class.
Some of my favorite books are:
The First-Time Forager: A safety-first guide to edible wild plants (National Trust) – A beautifully illustrated guide covering edible wild plants, including elderberries, with identification tips and recipes.
The Wild Food Plants of Ireland: The Complete Guide To Their Recognition, Foraging, Cooking, History And Conservation – a book specifically on foraging in Ireland with stunning pictures and a huge amount of information
The Forager’s Logbook – A great way to track foraging spots, plant cycles, and seasonal changes in your own handwriting.
Gathering Your Equipment and Ingredients
You know what they say – a craftsperson is only as good as their tools! After countless batches of elderberry cordial (and a few memorable kitchen disasters), I’ve perfected my equipment list and ingredient ratios. Let me save you some trial and error by sharing what I’ve learned along the way!
First, let’s talk equipment. You’ll want to gather these essential tools before you start:
- A large, non-reactive pot (I swear by my 8-quart stainless steel or enameled pot – avoid aluminum as it can react with the acidic berries)
- A wooden spoon (metal spoons can react with the berries and affect the taste)
- A reliable candy thermometer (temperature control is crucial – I learned this the hard way!)
- A fine-mesh strainer and cheesecloth or muslin (trust me, double-straining makes all the difference)
- A large measuring cup or pitcher for transferring liquid
- A funnel with a wide mouth (this will save you from sticky spills during bottling)
- Several clean tea towels (elderberry juice stains can be persistent!)
- A potato masher, berry crusher or simply a fork (optional but helpful)
Now, for the star of the show – the ingredients! Here’s my tried-and-true recipe that consistently produces excellent results:
- 300g fresh (or 150g dried) elderberries, cleaned and de-stemmed
- 300g sugar (we’ll talk about types in a moment)
- 600g filtered water
- Juice of 1 lemon (helps preserve color and adds brightness)
I always pick a lot of berries and dry them but you absolutely can buy dried Elderberries in your local health food store or via my affiliate link on Amazon.
Let’s talk sweeteners because this is where you can really customize your cordial. Traditional recipes call for white sugar, but I’ve experimented with various alternatives. Here’s what I’ve discovered:
- Organic cane sugar: My go-to choice – it produces a clean, classic flavor
- Coconut sugar: Offers a lovely caramel note but will make your cordial darker
- Maple syrup: Works well but use 75% of the amount called for in sugar
- Stevia: I don’t recommend it – it throws off the preservation properties
- Raw honey: Adds amazing depth but use 25% less as it’s sweeter (bonus: extra health benefits and therefore my go-to if our bees were busy!)
Want to kick things up a notch? Here are my favorite optional additions that can transform your basic cordial into something truly special:
- 1-2 cinnamon sticks (adds warmth)
- 2-3 whole cloves (perfect for winter batches)
- 1-2 star anise pods (lovely licorice note)
- 1 vanilla bean, split (adds incredible depth)
- 1-inch piece of fresh ginger, sliced (adds zip and extra immune support)
- Zest of one orange (brightens the flavor beautifully)
For storage containers, this is one area where you don’t want to cut corners. I learned this lesson after losing an entire batch to improper storage! Here’s what works best:
- Dark glass bottles (protects against light degradation) or just keep it in a dark cupboard
- Swing-top bottles (provides an airtight seal)
- Small bottles (8-16 oz) for regular use
- Larger bottles (32 oz) for bulk storage
- Clean, sterilized jars with tight-fitting lids
Whatever size you choose, make sure they’re thoroughly sterilized before use – I boil mine for 10 minutes or run them through the dishwasher on the hottest setting and put them into the oven for about 15 min at 100.
Here’s a game-changing tip I wish I’d known years ago: label everything! Write the date, ingredients (including any special additions), and even the sugar type used. I started doing this after mixing up my cinnamon-spiced batch with my plain one. Now I use simple adhesive labels or hang tags – they’re especially helpful if you’re giving bottles as gifts.
One final note about quantities: this recipe can be scaled up or down, but maintain the ratio of 1:1:2 (berries:sugar:water). I usually make multiple batches when elderberries are in season, because believe me, once your friends and family taste your homemade cordial, they’ll be asking for bottles of their own!
Step-by-Step Cordial Making Process
Preparing and cleaning the berries is a labor of love, but it’s essential for crafting the perfect elderberry cordial. First, gently rinse your freshly harvested berries under cool running water, taking care not to bruise or damage them. Next, meticulously pick through the clusters, removing any stems, leaves, or unsightly berries. This extra attention to detail will ensure your cordial shines bright with vibrant color and exceptional flavor.
Now, it’s time to get cooking! The key to unlocking the berries’ natural goodness is finding the Goldilocks zone of temperature and duration. Slowly simmer the prepared berries over medium heat, stirring occasionally, until they’ve softened and released their juices – usually about 20-30 minutes. Be sure not to let the mixture boil too vigorously, as that can cause the delicate flavors to become dull and muddled.
Once the berries have worked their magic, it’s time to strain the mixture for a crystal-clear cordial. Grab your trusty cheesecloth or fine-mesh sieve and gently coax the liquid through, taking care not to press too hard and extract any bitter tannins. Your patience will be rewarded with a smooth, silky cordial that’s bursting with the essence of autumn.
Finally, it’s time to check the consistency of your masterpiece. The perfect cordial should have a lovely, syrupy texture – not too thin, but not too thick either. Give it a gentle stir and observe how it coats the back of a spoon. If it seems a bit runny, simply return it to the stovetop and simmer until it reaches the desired viscosity. Voila, you’re ready to bottle and enjoy your homemade elderberry delight!
Traditional vs. Modern Methods Compared
Ah, the eternal debate—slow and steady or quick and efficient? When it comes to making elderberry cordial, both traditional and modern methods have their perks. Let’s break it down so you can choose the best fit for your kitchen.
The cold-process method is all about patience. The berries are macerated in sugar, slowly releasing their rich, complex flavors over days (or even weeks). This old-school technique rewards you with deep, nuanced taste—if you’re willing to wait.
On the other hand, the hot-process method speeds things up considerably. By gently simmering the berries, you can have a finished cordial in just a few hours. The tradeoff? Some of those delicate flavors may be lost in the heat, leaving a more fruit-forward profile.
Time is the biggest difference. The cold process takes anywhere from three days to three weeks, while the hot process wraps up in an afternoon—ideal if you need a quick batch for gifts or flu season prep.
Equipment-wise, the cold-process method is minimal: just a jar, sugar, and patience. The hot-process requires a heavy-bottomed pot, a sieve, and maybe a jelly bag for crystal-clear results.
For beginners? It’s a toss-up. The slow infusion of the cold method is forgiving, but the hot method is foolproof if you follow the steps closely. Either way, you’ll end up with a delicious bottle of elderberry goodness—your only real decision is whether you want it now or later!
Bottling and Storage Best Practices
The final frontier of cordial-making—bottling and storage! This last step determines whether your carefully crafted cordial stays vibrant and delicious for months to come. So, let’s make sure you get it right.
Sterilization is non-negotiable. Wash your bottles well in hot, soapy water, then sterilize them using boiling water, oven-drying, or a dishwasher cycle. I usually run mine through the dishwasher, rinse them, and pop them in the oven at 100°C (212°F) for 15 minutes—quick, easy, and effective.
Bottling temperature matters. Pour your cordial while it’s still warm (around 82°C / 180°F). As it cools, it will create a natural seal, keeping air out and freshness in.
Storage is all about location. Keep your bottles in a cool, dark place—a pantry, cellar, or even the fridge works well. Light and heat are the enemies of flavor, so protect your cordial from both. When properly stored, it should stay at peak quality for 6-12 months.
How do you know when it’s past its prime? Watch for cloudiness, sediment, or mold. If the color fades, the aroma weakens, or the taste seems off, it’s time to say goodbye.
With a little care, your homemade cordial will keep bringing joy—whether sipped on cozy evenings or shared with friends. Cheers to a job well done!
Troubleshooting Common Issues
The joys of homemade cordial-making – the vibrant colors, the tantalizing aromas, the silky-smooth mouthfeel. But, let’s be honest, it’s not always a seamless journey, is it? Here are a few things to look out for.
First up, the cloudy cordial. This can happen for a variety of reasons, from incomplete straining to the presence of pectin or other suspended solids. Fear not, there’s a simple solution: a quick run through a coffee filter or even a bit of gelatin can work wonders to clarify your cordial and restore that coveted crystal-clear shine.
Is your cordial is a bit too tart, or maybe it’s verging on cloying. No problem! A few judicious drops of honey or a sprinkle of sugar can help you find that perfect balance of sweet and tart that will have your taste buds singing.
And what about those pesky fermentation woes? If you notice signs of bubbling or fizzing, don’t panic – it’s just nature’s way of getting in on the action. Simply transfer your cordial to the fridge to slow down the process, or consider adding a touch of citric acid to prevent further fermentation.
Let’s not forget the dreaded mold. Should you spot any fuzzy, discolored patches, don’t even think about salvaging that batch. Better to err on the side of caution and start fresh.
Lastly, let’s tackle the scourge of crystallization. If you notice your cordial developing those unsightly sugar crystals, fear not – a gentle reheating should dissolve them right back into the liquid. Just be sure not to let it boil, as that can further exacerbate the problem.
Remember, every challenge is an opportunity to learn and grow. With a little troubleshooting know-how and a whole lot of patience, you’ll be crafting picture-perfect cordials in no time. Cheers to your continued success!
Elderberry cordial recipe
Let’s get brewing some elderberry magic!
Ingredients:
- 300g fresh Elderberries
- 300g water
- 100g raw honey
- 1 cinnamon stick or ground to taste
- Juice of half a lemon
- 1 little pinch of ground cloves
- 1/2 inch of ginger peeled
Method:
- add Berries, water, ginger, cloves and cinnamon to a saucepan and bring to the boil before turning it down to a simmer.
- reduce until half the liquid remains
- take from the heat and strain
- once cooled down a good bit add the raw honey and lemon and fill into sterilized bottles
Conclusion: Cheers to Your Cordial-Making Adventures!
And there you have it, my fellow cordial connoisseurs—everything you need to master the art of elderberry goodness! From perfecting the step-by-step process to choosing between traditional and modern methods, you’re now armed with all the know-how to craft a cordial that will have friends and family singing your praises.
But the real fun begins now! Whether you’re sipping it straight for a wellness boost, swirling it into a cocktail, or drizzling it over a decadent dessert, your homemade elderberry cordial is about to become a pantry staple you’ll wonder how you ever lived without.
And let’s not forget the gift-giving magic! Picture the joy on a loved one’s face as they receive a beautifully bottled batch of your handcrafted creation. It’s a gift from the heart—one that will be cherished (and eagerly devoured) long after the last drop is gone.
So, what are you waiting for? Grab your berries, don your apron, and let the cordial-making adventures begin! With a little patience, a whole lot of love, and these foolproof tips in your back pocket, you’re well on your way to becoming the go-to cordial maker in your circle.
Cheers to your delicious journey—I can’t wait to hear all about your creations!